
I’m no stranger to broadcasting my thoughts, opinions, and occasional lack of knowledge across the eternal internet. That said, I do pride myself on one thing as a shameless producer of mediocre content: I’ve never blogged about blogging, the state of blogs, or the act of creating blogs. Bloggers who blog about blogging carry the same lack of substance derived from rappers who rap about the act of rapping. Unfortunately for all of us, my untarnished record of blogging-about-blogging ends today.
We recently rewrote the blog theme for Hackers and Slackers in GatsbyJS: arguably the sexiest option for generating static sites on the JAMStack.
Why You're Probably Here
You're not here to learn what a JAMStack is, why it’s beneficial, or why you should think they’re cool. There's plenty of well-written documentation on the topic, and there are even more poorly written Medium articles that mostly copy & paste the former. Apologies for the grumpiness- I’ve been JAMing a bit too hard lately.
I'm here to shed light on implementing a stack that's worked well for me: Ghost as a CMS, GatsbyJS as a static site generator, and Netlify for deployment. This is an excellent combination of tools, but there's an absurdly frustrating lack of centralized documentation on how these pieces fit together. Each of these services has excelled at delivering its portion of the pipeline. We're here to put the pieces together.
This series is going to walk through how Gatsby generates static sites. To accomplish this, we're going to create our own Gatsby theme and walk through Gatsby's end-to-end build process. For the sake of this tutorial, we're going to assume you have basic knowledge of GraphQL and React.
Why Ghost as a Headless CMS?
Netlify has effectively cornered the market as the de-facto host of Gatsby sites, which leaves our choice of CMS to be the most significant decision we need to make in our stack. In my opinion, Ghost is an attractive CMS option because of its philosophy of simplicity. The team behind Ghost has shown a respectable amount of restraint when it comes to adding bloated features and data types, which becomes especially important when managing the schema of a static site generator.
When building a website with Gatsby, your site's structure is dictated by the relationships predetermined by your primary source of information. Our raw data implicitly makes fundamental decisions about our site's structure, such as what constitutes "page," or which attributes data models have, such as "tags." Ghost provides us with what we'd expect from a CMS originally intended for blogs: we have authors creating pages/posts which contain tags. It's what we need to build the structure of a static site.
CMS options like Strapi, Prismic, and Contentful are fantastic in what they're able to achieve by abstracting content types. Strapi doesn't even assume the relationship between pages and authors unless you explicitly create those content types and define a many-to-many relationship between them. While this is extremely powerful, I've found that the power to change the fundamental data structure of a site is more dangerous than beneficial. Sometimes we need to protect us from ourselves. This is where Ghost comes in: aside from being a good CMS, Ghost allows us to build a site structure first and extend on it later.
Starting a GatsbyJS Theme
First things first, we'll need to install the Gatsby CLI. The CLI allows us to create new Gatsby projects from the command line easily:
npm i gatsby-cli -gInstall Gatsby CLI globally
The best way to get started with Gatsby is by cloning one of the many starter templates Gatsby has to offer and iterating on them to make the theme our own. Because we're using Ghost as our CMS, it makes the most sense to start with the Ghost starter template. Gatsby-CLI makes it easy to create new Gatsby projects from existing ones on GitHub, like so:
gatsby new my-gatsby-project https://github.com/TryGhost/gatsby-starter-ghost.gitCreate a new Gatsby project
Running gatsby new is essentially the equivalent of running git clone and npm install within the resulting folder. The only difference is gatsby new will not retain a git remote, wheres git clone would.
We can already run our site locally to see what we've started:
$ cd my-gatsby-project
$ gatsby develop
Run Gatsby locally
The gatsby develop command generates a static site in the directory of a Gatsby project in development mode. We can now preview our theme locally at https://localhost:8000:

Now that we have a working Gatsby theme, we can begin to dissect how Gatsby works. Let's start by dealing with all this placeholder content.
The Ghost Gatsby starter theme is configured to point to placeholder content by default. We can easily configure our theme to point to our own Ghost admin instead by changing the values in .ghost.json:
{
  "development": {
    "apiUrl": "https://gatsby.ghost.io",
    "contentApiKey": "9cc5c67c358edfdd81455149d0"
  },
  "production": {
    "apiUrl": "https://gatsby.ghost.io",
    "contentApiKey": "9cc5c67c358edfdd81455149d0"
  }
}
.ghost.json
The config asks for two values: an apiUrl and a contentApiKey. These are referring to values you'll find in your own Ghost admin by creating an integration on the integrations tab. Here's what mine looks like:

Creating any integration will provide us with a Content API Key and an API URL, which are the two things we need for our config:
{
  "development": {
    "apiUrl": "https://hackersandslackers.com",
    "contentApiKey": "8a1becd7267fd71108c327c0f6"
  },
  "production": {
    "apiUrl": "https://hackersandslackers.com",
    "contentApiKey": "8a1becd7267fd71108c327c0f6"
  }
}
.ghost.json
Save this file and confirm that https://localhost:8000 now serves your content (if you left gatsby develop running, the site should hot reload for you). Changes are that your content isn't going to immediately look great. This is what my abomination looks like:

The content coming from my Ghost admin looks awful in a default theme, which shoudn't surprise us. We're going to need to make some changes to this theme.
Anatomy of a Gatsby Site
Navigating a Gatsby theme for the first time is probably a bit overwhelming. There’s a lot of Gatsby-specific things we’ve never seen before (obviously), which might be challenging to dissect at first glance. Let’s see what we’ve got:
/my-gatsby-project
├── /src
│ ├── /components
│ ├── /pages
│ ├── /styles
│ ├── /templates
│ └── /utils
├── /static
│ ├── /images
│ └── /fonts
├── /public
├── /node_modules
├── package.json
├── package-lock.json
├── .ghost.json
├── netlify.toml
├── gatsby-node.js
├── gatsby-config.js
└── gatsby-browser.js
/my-gatsby-project
Gatsby's purpose is to take raw data from sources (like our Ghost admin), use that data to inform our site's structure, and finally transform our data to produce a site mostly comprised of static HTML and CSS. All of these static pages, styles, and assets live in the public folder. You should never need to work within this folder, as it's output will change with every build.
Building to the Public Folder
The simplicity of static sites enables them to have speedy load times. Static pages don’t need to think about which widgets or navigation items to display each time a user loads a page. They don’t need to rely on frontend JavaScript to manipulate pages. Most impressive of all, this particular breed of static site doesn’t need to wait before loading the pages you’ll probably click on next. Because every static page has a finite number of links to other static pages, Gatsby can load pages before you click on them.
We’re tossing the word “static” around a lot here, which sounds kind of like we're dealing with the types of shitty sites we made using Dreamweaver in the '90s. Those were the days where changing a single link meant changing that same link manually on 100 other pages. Perhaps you're a bit more modern and picturing a workflow more along the lines of Jekyll and GitHub pages. The default method of deploying a production Gatsby site is by using the gatsby build command, which generates a site comprised of unintelligent markup and styles. That said, most Gatsby developers will hardly need to deploy using gatsby build at all.
The "A" in JAMstack stands for APIs. By setting up webhooks in our Ghost admin, we can trigger a gatsby build job every time we update content in our CMS. Most static sites are hosted on services like Netlify, which continuously listen to for changes to our content via webhooks and rebuild our website accordingly. Setting up such a webhook in Ghost is as easy as expanding on the integration we created earlier. Here's what I use to automatically trigger builds to Netlify upon content updates in Ghost:

The reality of GatsbyJS and other site generators in the JAMStack is that they're hardly "static" at all. Even though the pages we serve to user clients are technically "static," a simple webhook has our Gatsby theme rebuilding itself over and over, remaking the contents of the public folder from scratch each time.
Templates, Pages, and Components
So, the end result of gatsby build or gatsby develop is to generate the files which make up our site and dump them into the public folder. After sourcing our own content and seeing the ugly result, it's clear that we're going to make some changes to our page layouts. The first logical move would be to make changes to the presentation layer, which is contained entirely in the src folder.
Gatsby's src folder contains the logic for generating the HTML and stylesheets which ultimately make up the pages that get built. Each JavaScript file living in src is essentially a React component. Each of these components output JSX as a result of their own GraphQL queries (or data passed in from other components' GraphQL queries). Most of the time we spend customizing our theme will occur in the src folder.
Let's first concentrate on customizing a page template.
Templates
A template is a repeating page structure that will be used by multiple pages on our site. A perfect example of when to use a template would be blog posts. Blogs typically have thousands of "posts" in the sense of content, but each of these posts likely utilizes a single "post" template. All sites follow these types of patterns, thus our templates are going to determine the vast majority of what people see on our site.
Here's a simple example of what a GatsbyJS blog post template looks like:
import React from 'react'
import PropTypes from 'prop-types'
import { graphql } from 'gatsby'
import Helmet from 'react-helmet'
import { Layout } from '../components/common'
import { MetaData } from '../components/common/meta'

const Post = ({ data }) => {
  const post = data.ghostPost

  return (
      <>
        <MetaData
          data={data}
          title={post.title}
          description={post.excerpt}
          type="article"
        />
        <Layout>
          <div className="container">
            <article className="content">
              { post.feature_image &&
                <figure className="post-feature-image">
                  <img src={ post.feature_image } alt={ post.title } />
                </figure>
              }
              <section className="post-full-content">
                <h1 className="content-title">{post.title}</h1>
                <main
                  className="content-body load-external-scripts"
                  dangerouslySetInnerHTML={{ __html: post.html }}
                />
              </section>
            </article>
          </div>
        </Layout>
      </>
  )
}

Post.propTypes = {
  data: PropTypes.shape({
    ghostPost: PropTypes.shape({
      title: PropTypes.string.isRequired,
      html: PropTypes.string.isRequired,
      feature_image: PropTypes.string,
    }).isRequired,
  }).isRequired,
  location: PropTypes.object.isRequired,
}

export default Post

export const postQuery = graphql`
  query($slug: String!) {
    ghostPost(slug: { eq: $slug }) {
      title
      html
      feature_image
    }
  }
/src/templates/post.js
Templates are comprised of three parts:
- GraphQL Data: At the bottom of our template, we have a GraphQL query named
postQuery. This query speaks to the Ghost admin to grab post-specific information for the current page: the title, HTML, and feature_image. Running this query allows us to use this data in our template as part of thedataobject being passed toPost. If we wanted our post to include information like the name of the author, we'd have to add that field to our query as well. - PropTypes: We need to type-check the results of our GraphQL query before we can utilize this data in our page. We associate each item of data with the data type we're expecting by setting PropTypes.
- Template Structure:
Postis the JSX which will ultimately output each post page. This is essentially a React Component that is accepting a parameter called "data," which is the data we grabbed in our GraphQL query,postQuery. Take note of how we build our template in JSX and include the data we decided was important to include, such as{ post.title }or{ post.feature_image }.
Components
A component is a reusable block of code typically shared by multiple pages, such as widgets or navigation items (a better term for these would be "partials"). Partials are reusable code intended to be shared by pages and templates. For example, I have a component called AuthorCard, which details the information of a single author:
import React from 'react'
import PropTypes from 'prop-types'
import { Link } from 'gatsby'

const AuthorCard = ({ author, headerClass }) => {
  const authorTwitterUrl = author.twitter ? `https://twitter.com/${author.twitter.replace(/^@/, ``)}` : null
  const authorFacebookUrl = author.facebook ? `https://www.facebook.com/${author.facebook.replace(/^\//, ``)}` : null
  const classes = headerClass ? `author-card info-card` : `author-card`

  return (
      <>
        <header className={classes}>
          <div className="author-card-image">
            {author.profile_image ? <img className="lazyload" data-src={author.profile_image} alt={author.name} /> : <FontAwesomeIcon icon="user-edit" size="sm" /> }
          </div>
          <div className="author-card-content">
            <Link to={`/author/${author.slug}`} className="author-card-name">{author.name}</Link>
            <div className="author-card-meta">
              {author.postCount && <span className="author-card-item">{author.postCount} Posts</span>}
              {author.location && <span className="author-card-item">{author.location}</span>}
              {author.website && <a className="author-card-item" href={author.website} target="_blank" rel="noopener noreferrer">Website</a>}
              {authorTwitterUrl && <a className="author-card-item" href={ authorTwitterUrl } target="_blank" rel="noopener noreferrer">Twitter</a>}
              {authorFacebookUrl && <a className="author-card-item" href={ authorFacebookUrl } target="_blank" rel="noopener noreferrer">Facebook</a>}
            </div>
            {author.bio && <p className="author-card-bio">{author.bio}</p>}
          </div>
        </header>
      </>
  )
}

AuthorCard.propTypes = {
  author: PropTypes.shape({
    name: PropTypes.string.isRequired,
    bio: PropTypes.string.isRequired,
    profile_image: PropTypes.string,
    website: PropTypes.string,
    twitter: PropTypes.string,
    facebook: PropTypes.string,
    postCount: PropTypes.number,
    location: PropTypes.string,
    slug: PropTypes.string,
  }).isRequired,
  headerClass: PropTypes.boolean,
}

export default AuthorCard
/src/components/authors/AuthorCard.js
Components and GraphQL
Component files are structured in the same way as templates, with a fundamental difference: components cannot create dynamic GraphQL queries.
The structure of AuthorCard has the same fundamental structure as our Post template, but AuthorCard does not have its own GraphQL query. AuthorCard instead is able to accept a parameter while being defined; this means whichever page/template contains this partial can simply pass data from the parent page's GraphQL queries into child components.
In the AuthorCard example, one of our input parameters is called author which seems to contain all the author-related data we need! To do this, we can import our author card into our post template and include it in Post's JSX:
import { AuthorCard } from '../components/authors'
...

const Post = ({ data }) => {
  const post = data.ghostPost
  const author = data.ghostAuthor

  return (
  	...
    <AuthorCard author={author} />
    ...
  )
}
/src/templates/post.js
author is looking for data.ghostAuthor, which we get by expanding on our post's GraphQL query:
export const postQuery = graphql`
  query($slug: String!, $primaryAuthor: String!) {
	...
    ghostAuthor(slug: {eq: $primaryAuthor}) {
      postCount
      location
      facebook
      cover_image
      bio
      name
      slug
      twitter
      website
      profile_image
    }
	....
  }
/src/templates/post.js
The thinking here is that templates should pass contextual data on to their child components. There is sanity in keeping our GraphQL queries on the templates that utilize them, as opposed to letting templates and their children pull data independently of one another.
AuthorCard now has contextual information about the author.
Static Queries in Components
There are cases where components can execute GraphQL queries, but only under the circumstance that they pull data which is not contextual. In other words, these components can only run GraphQL queries that do not utilize variables. These queries are called Static Queries. It's best not to linger on this topic, but here's an example of where a static query is used for site-wide metadata in our Ghost Gatsby template:
const MetaDataQuery = props => (
  <StaticQuery
    query={graphql`
      query GhostSettingsMetaData {
        allGhostSettings {
          edges {
            node {
              title
              description
            }
          }
        }
      }
    `}
    render={data => <MetaData settings={data} {...props} />}
  />
)

export default MetaDataQuery
/src/components/common/meta/MetaData.js
Pages
The third and final type of layout in GatsbyJS are pages, not to be confused with templates. Where templates are reusable, Gatsby pages are pages that will only ever exist once on our site, such as an error page or transactional confirmation. The syntax for creating a page is identical to that of creating a template.
Every page we create will inevitably require some standard information. No matter what our page is for, it's going to need a title, some metadata, and a URL (obviously). Ghost provides us with a number of GraphQL Fragments to help us grab all properties of a page (or post) at once:
export const pageQuery = graphql`
  query GhostPageQuery($slug: String) {
    ghostPage(slug: {eq: $slug}) {
      ...GhostPageFields
    }
  }
`
/src/templates/page.js
Gatsby Configuration & Plugins
Cruising through the src folder gives us a pretty good idea of how to modify the structure the pages our site will serve. That's great, but where does the data feeding these pages actually come from? How do our components know the data source we're querying? Without any data model configuration on our side, our components already recognize things like ghostPage and ghostPost as data types.
Sourcing data to Gatsby happens in a magic file called gatsby-config.js. Gatsby is configured by installing and tweaking an entire ecosystem of Gatsby plugins, and some of those plugins tell Gatsby where to look for our data. If you're familiar with Webpack, gatsby-config is essentially identical to a Webpack configuration file. A few examples of what our theme already includes:
- gatsby-plugin-feed: Generates a highly-configurable RSS feed for our site.
- gatsby-plugin-advanced-sitemap: Serves an SEO-friendly sitemap.
- gatsby-plugin-react-helmet: Provides a JSX element to easily set metadata per page.
These are all fine and necessary, but the plugins we want to pay special attention to are the ones with the prefix "gatsby-source-". Our config has a few of these by default: gatsby-source-filesystem, and gatsby-source-ghost:
...
{
  resolve: `gatsby-source-filesystem`,
  options: {
    path: path.join(__dirname, `src`, `images`),
    name: `images`,
  },
},
{
  resolve: `gatsby-source-ghost`,
  options: process.env.NODE_ENV === `development` ?
    ghostConfig.development :
    ghostConfig.production,
},
...
gatsby-config.js
gatsby-source-filesystem is a plugin that sources content from our local file structure. In the above example, it's being used to serve images from a local folder. If we wanted to, we could source our entire Gatsby site from locally saved Markdown files. Luckily, we aren't the types of savage barbarians who blog by building Jekyll sites. We're gentlemen, just as the Great Gatsby himself.
gatsby-source-ghost allows us to query content from Ghost sites. Simply installing this plugin gives us access to Ghost data models in our GraphQL queries. In terms of knowing which Ghost admin to source from, this is what we handled when we configured .ghost.json.
As it turns out, sourcing content to Gatsby is perhaps one of it's most alluring features. Our configuration is already pulling from two content sources, and adding a third source would be as easy as installing a plugin. We're not just talking about multiple CMS sources; Gatsby allows us to source content from Github repositories, Tweets, JIRA, or even databases directly. Each "source" plugin we install gives us opportunities to create powerful associations between our data, joining information from different sources without ever touching a database.
Data Sources in Action
You've probably noticed the prompt Gatsby gives after running gatsby develop, which encourages you to explore your site's data schema at https://localhost:8000/___graphql. This GraphQL playground is your best friend: the easiest way to understand the resulting schemas of sources you configure is via this interface. Here's what my schema looks like after installing gatsby-source-git and @gatsby-contrib/gatsby-transformer-ipynb to pull and parse Jupyter notebooks from a Github repo:
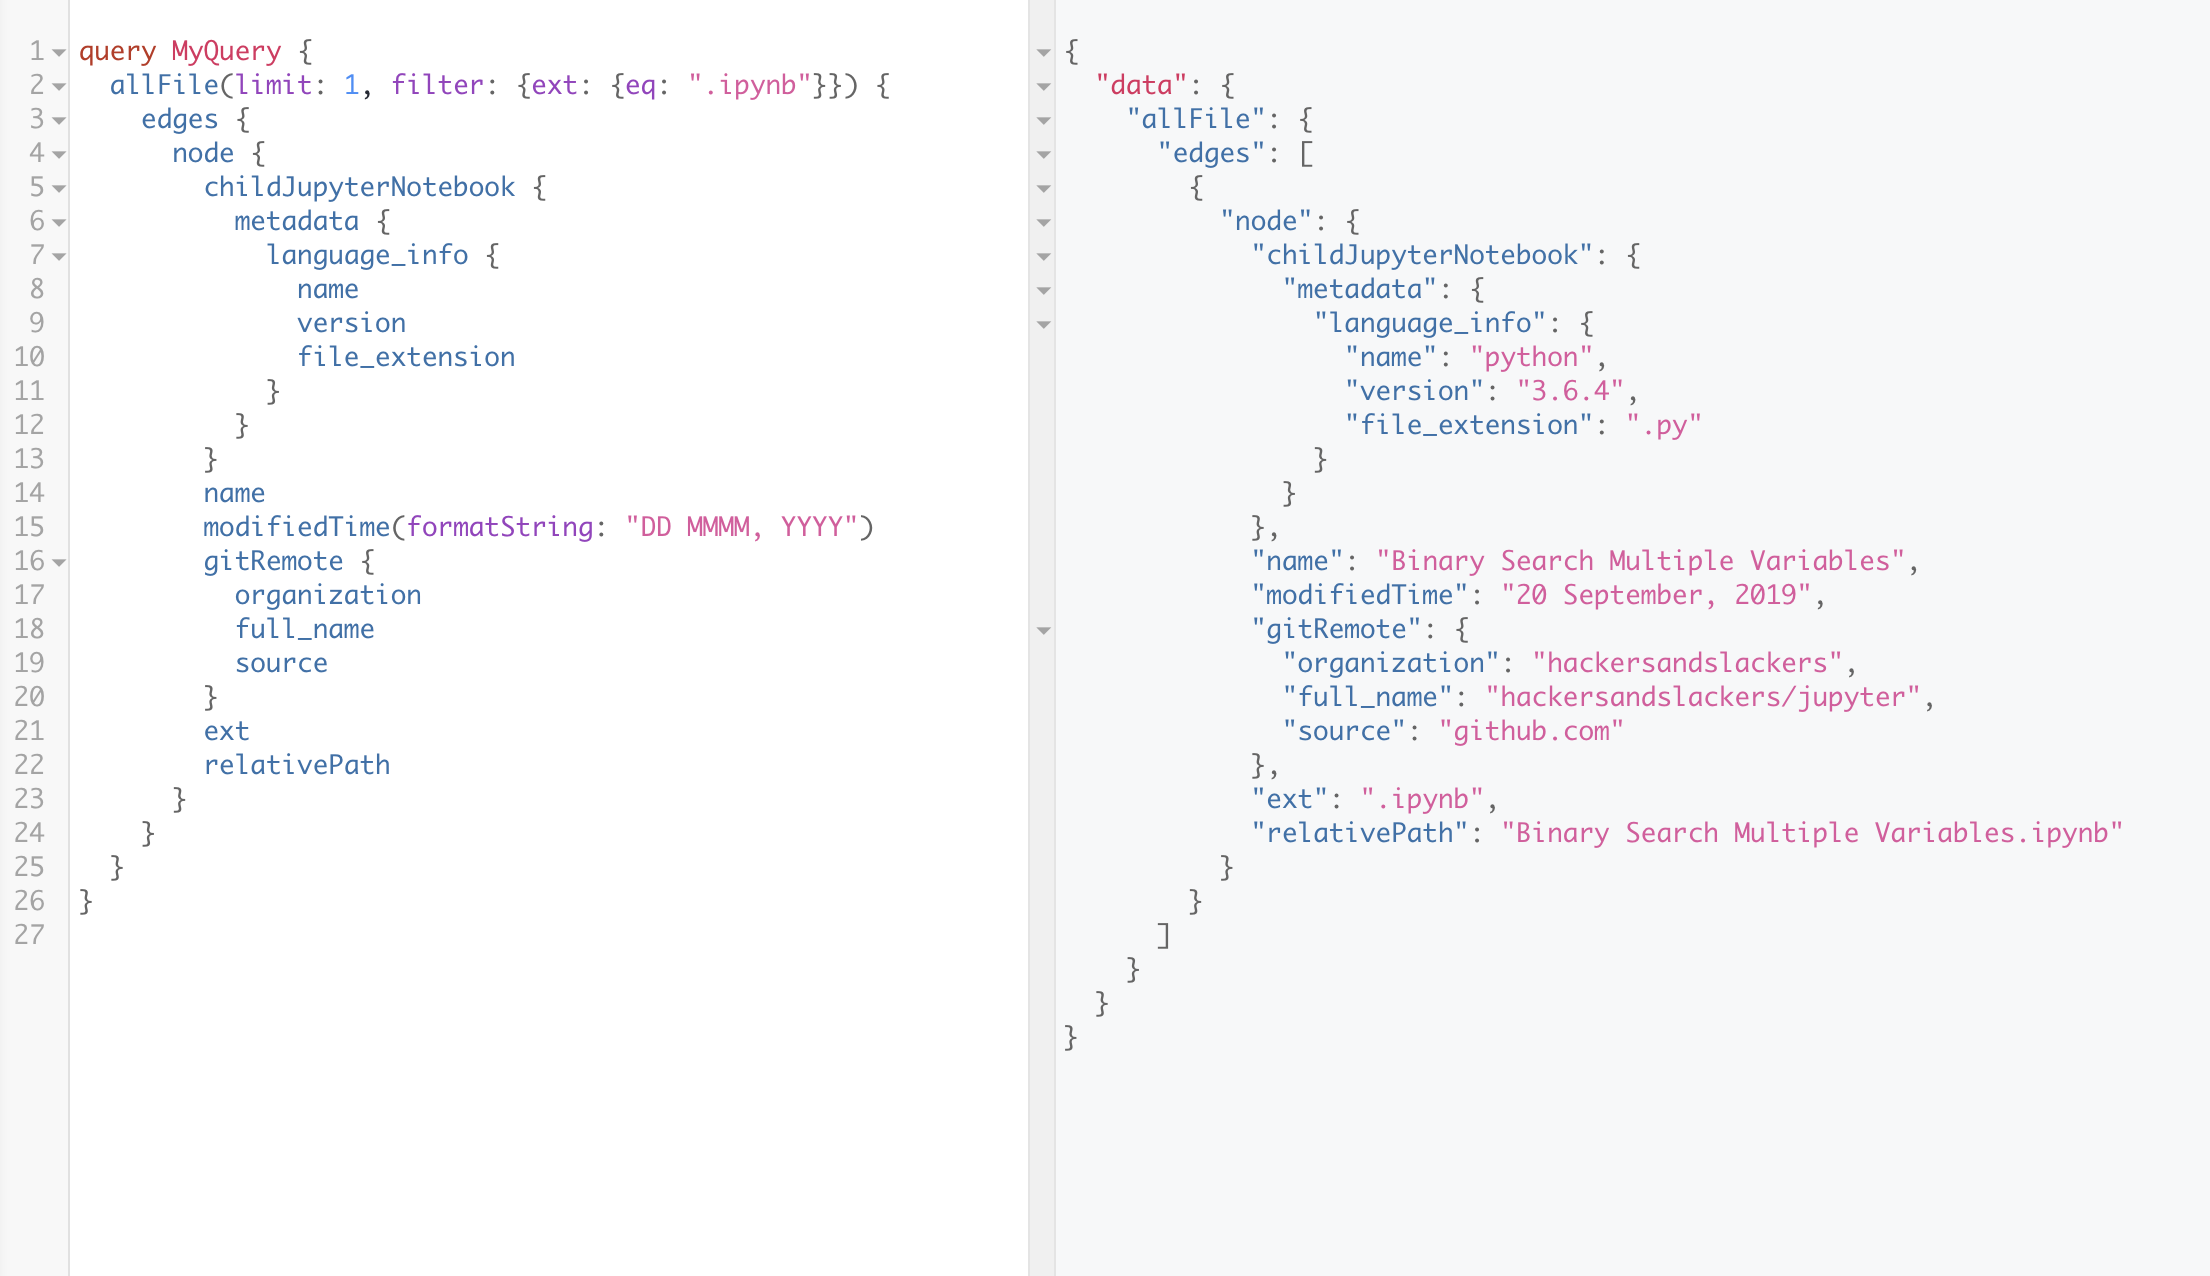
Adding two plugins is the only configuration needed to build this query. Here's what we just achieved with minimal effort:
- Gatsby recognized that files were added to our local file structure and provided us with information about said files (such as file name, extension, etc.). We can query all of these attributes.
- Of the local files Gatsby found, our newly added plugin identified .ipynb files as Jupyter Notebooks. This allows us to query Jupyter-specific attributes of those files, in addition to the general information we already had accessible.
- Gatsby also recognizes that these Jupyter files were sourced from Github, so we can pull repository-level metadata about where these pages were sourced from.
This is absolutely insane. It's difficult to express how powerful this is in words, so I won't even try. Let's move on.
Building Routes in Gatsby
We now know how Gatsby sources its data, and how Gatsby eventually creates pages from that data. The third and final piece of our puzzle is between these two layers. This piece of our site handles the URL patterns and routing of the pages we create, and it all happens in gatsby-node.js.
Before our site can be built, we need to know how it'll be structured. Blogs in particular share a few common patterns. They usually have paginated lists of posts, author profiles, and "tag" pages where posts sharing a particular can all be viewed at once. We happen to be in luck because our Ghost starter template handles all of these things for us. As briefly as possible, the chain of events happening in gatsby-node is like this:
- Content sources are queried for only the information necessary to build routes to our pages
- The queried data is split into a single segment per template type. For example, we extract the names of all the posts we'll publish by setting
const posts = result.data.allGhostPost.edges. The same is done for author pages, static pages, etc. - With our data grouped 1-to-1 with the pages they create, we then loop through each group to call a
createPagefunction. Let's use posts as an example. In this step, we're telling Gatsby to create a page using thepost.jstemplate for each "post" we pull in GraphQL. A part of this process is passing the URL structure of where each of these generated pages will live.
There's a lot to take in here. Luckily for us, our template already handles the heavy-lifting of creating a site structure for us. When the time comes to add a new static page or grouping of templates, following the format of what already exists in gatsby-node.js is relatively straightforward.
Page Contexts in gatsby-node
If there's one pitfall of working through the gatsby-node file, it would be the concept of "page contexts". Let's look at the createPage function I have for creating posts:
createPage({
    path: node.url,
    component: postTemplate,
    context: {
    // Data passed to context is available
    // in page queries as GraphQL variables.
    slug: node.slug,
    primaryAuthor: node.primary_author.slug,
    primaryTag: node.primary,
    seriesSlug: node.series,
    seriesTitle: node.name
    },
  })
gatsby-node.js
The first two parameters of createPage are simple: path determines the route of this instance of a page, and component refers to whichever React component in src we want to build the page with.
context is where things get interesting. Variables passed into a page context can be accessed by the target template in two ways. The first way is as a variable in the template's GraphQL query (this is how we see things like query($slug: String!) ). Passing variables to pages is useful if a page contains features that depend on knowing more about which instance of a page it is. For example, I pass primaryTag to posts as a way of querying other posts with the same primary tag to build a related posts widget.
We're getting way too deep here. I won't even mention the pageContext object, which gets passed into templates for purposes of things like pagination. Let's move on.
What About Frontend Javascript?
Client-side JS should be a last resort when building static sites, but there are times when it needs to happen. gatsby-browser allows us to execute client-side Javascript in response to browser events like onRouteUpdate(), which is triggered each time a user changes pages. This is how we can implement code syntax highlighting, for example.
The full list of browser events we can use to trigger scripts can be found here.
Is Gatsby THAT Great Tho?
It's right to be skeptical of any new technology. This is especially the case with JavaScript frameworks, the hype cycle of which has become a meme in itself . After writing over 4 thousand words attempting to explain the internals of Gatsby at a high-level, it's clear that Gatsby is architecturally complicated. For newer devs who might not have previous experience with React, GraphQL, or Webpack, I can only imagine how one can feel at the bottom of the mountain looking up.
For more experienced developers, Gatsby is totally that great. Gatsby improves on so many aspects of modern web development that it's difficult to summarize why Gatsby is so great to those for whom it is suited. Praising "faster load times" doesn't do justice to the efficient, painless ecosystem of GatsbyJS. This is a rare moment where I'd argue that a framework lives up to the hype, at the very least.
That said, we need to acknowledge the implications that things like Gatsby creates for developers as a whole. For those of us who've grown up with Javascript's nuances and frameworks, learning Gatsby is a manageable step forward. It's easy to neglect that this is only true because we've accrued a lifetime of related knowledge before this point. This knowledge puts us in a favorable position to learn one more thing. If we were to imagine being on the outside looking in, it feels like Gatsby is another layer of "things to know" in the comical collection of nonsense that is Javascript. While I'm an advocate of Gatsby, it's important to recognize that learning Gatsby is a privilege of circumstance. Most employed developers work for enterprises that can not (nor ever should) consider major changes to their technology stacks. It's unreasonable to think "this is the direction the world is going," because most people in the world are preoccupied with making the world work. And families, or whatever.
Anyway, Gatsby is excellent if you're in any position to pick it up. Ask yourself, are you:
- Working for a young startup that uses Node?
- A student school and have a lot of time?
- A self-destructive personality that causes them to stay up until 4am every night to learn new frameworks just to post about them?
If you answered "yes" to any of these, then picking up Gatsby is definitely worth your time.