
Static site generators are experiencing a respectable rise in popularity amongst developers, yet we're likely only seeing the beginning of a paradigm that has yet to fully explode. GatsbyJS and NextJS have tantalized the JavaScript community by effectively incorporating trendy paradigms, while Hugo speaks to the swaths of developers embracing Golang. These static-site frameworks are irresistibly enjoyable to use while providing real value: a rare combination of traits which will undoubtedly create opportunities for wealth generation. It's hard to argue that anybody is better positioned to capitalize on the static-site trend than Netlify: the defacto host and CDN for statically-generate sites.
I maybe be impossible to overstate the significance Netlify has established in the JAMStack ecosystem. Given the relative youth of the JAMStack, Netlify comfortably sits as the undisputed frontrunner for hosting sites of static content which must be built by receiving Webhooks actions. If "static-site hosting" were a market segment susceptible to anti-monopoly laws, it would be fair to say that Netlify is the inescapable option for hosting sites generated via the JAMStack.
Commentary aside, we're here because we share a common addiction: the need for speed. Static sites are fast, thanks to a number of factors such as precompiled pages and aggressive preloading 0f pages. Today we'll be diving deep into Netlify's performance tuning optimizations to feed our insatiable thirst for speed on two fronts: page load times, and build times. Before we uncover some of the secrets to crack out our site, but let's briefly touch on the benefits Netlify gives us out-of-the-box.
Netlify as a Global CDN
Sites hosted on Netlify are immediately propagated to edge nodes in across Netlify's CDN. A representative from Netlify briefly went into details regarding the topic on HackerNews a while back:
Our CDN is global yes. Actually, when you deploy to netlify, we'll fingerprint all your assets (CSS, JS, images) and rewrite the URLs in your HTML so we can serve those straight out of Akamai's CDN with a 1 year max-age. We run our own CDN for the actual HTML files, currently we have edge nodes in 7 datacenters around the work. This CDN is super optimized to this use case, which means you'll get a 90%+ cache hit rate on your HTML from our cache servers, while still getting instant cache invalidation whenever you push a new deploy. This is also what allow us to do more complex things like proxying, OAuth1 request signing and pre-render support directly at the CDN level. We currently beat all the services we run regular benchmarks again in our internal benchmarks for real user performance.
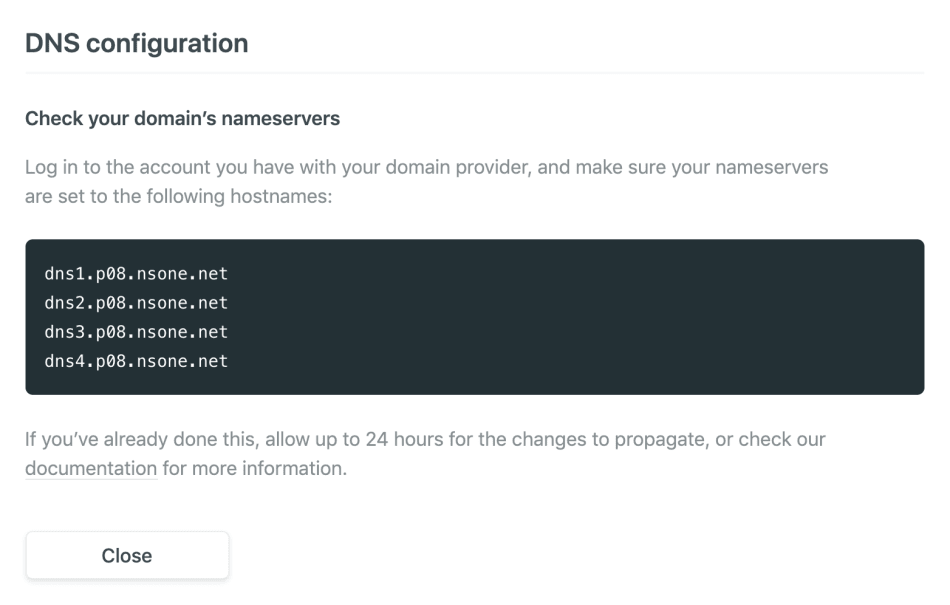
It's a nice touch with an enticing name: Netlify Edge. Having a CDN is better than no CDN, but to claim Netlify's handful of datacenters located in Frankfurt, Singapore, San Francisco, New York, Sao Paolo, and Sydney will ever rival the sheer distribution of Cloudflare or Cloudfront is a far reach from reality. Nonetheless, we're talking about blazingly-fast static sites here, so let's be sure to utilize Netlify's CDN correctly - which isn't a given if you happen to be DNS-challenged.
To utilize Netlify Edge, point your domain to Netlify's nameservers:
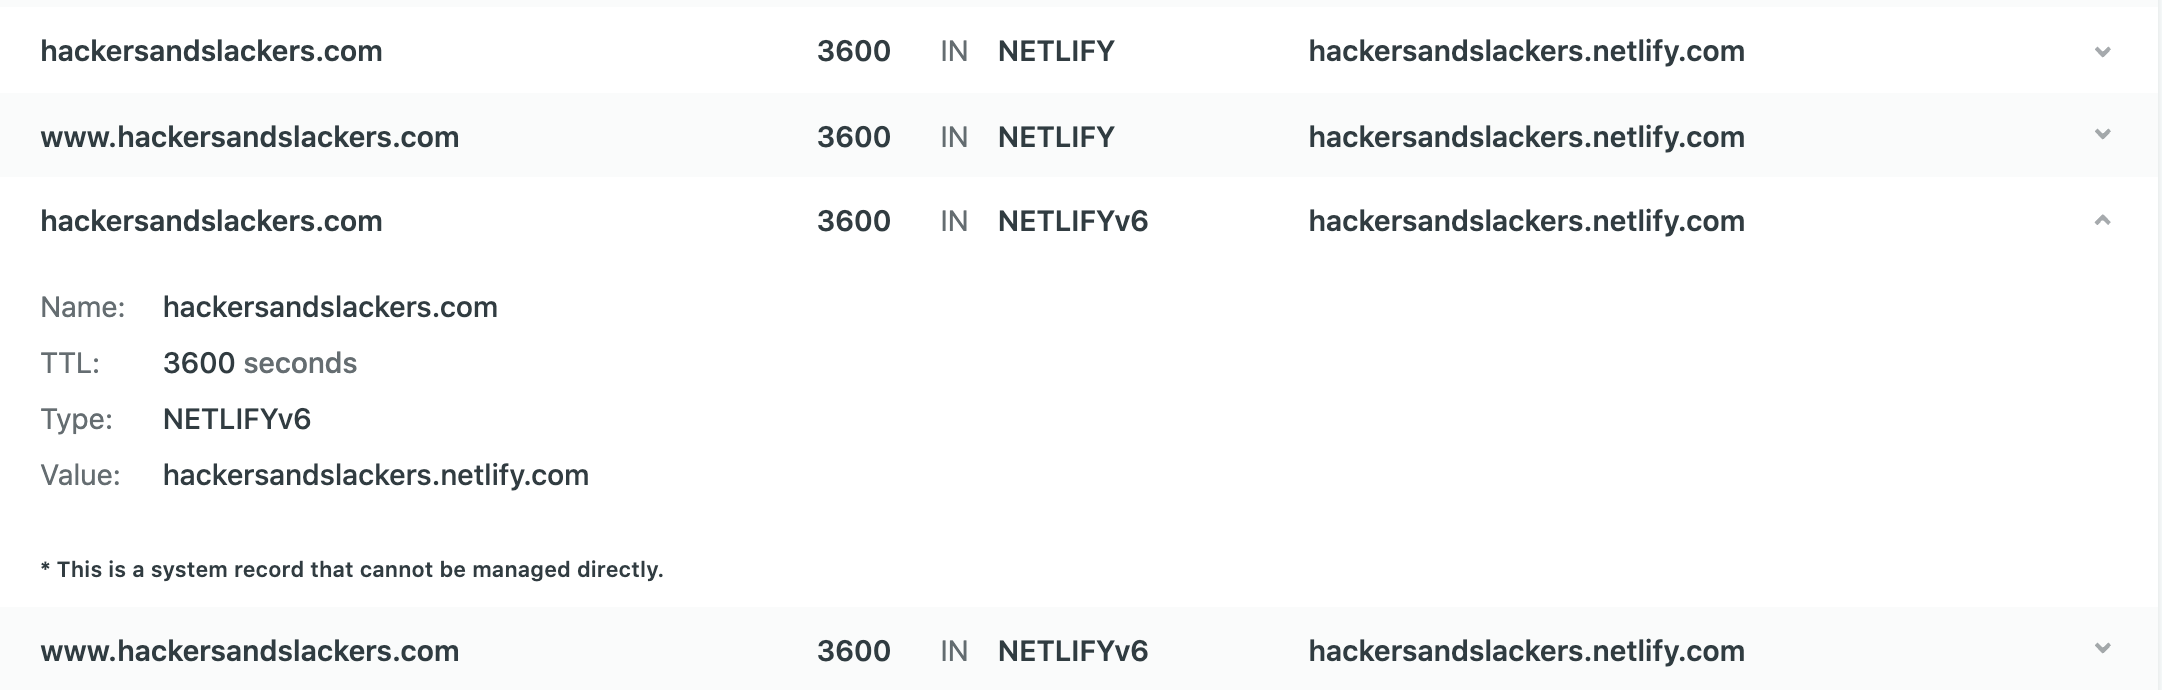
From there, create DNS records as you please:
As an added bonus, pointing your domain to Netlify's nameservers will automatically hook you up with an SSL certificate via Let's Encrypt. It's a nice freebie:
Enable Caching & Incremental Builds
Now let's get to the good stuff: caching and incremental builds. As we know, static sites generated via Webhooks are typically rebuilt from scratch upon any content change. For this particular site, that entails over one thousand pages static being rebuilt every time I correct a typo. Netlify has researched a way to utilize dark magic to avoid this from happening, thus outgoing Webhooks will only rebuild the pages which have changed. This is the difference between a 5 minute build time versus a 10-second build time (roughly, I don't know, sue me).

The easiest way to get started is by leveraging a relatively new concept called Build Plugins, which are third-party plugins to be executed upon site build. The full catalog can be found here.
To make sure you're set up, leave the Netlify UI for a minute and fire up your GatsbyJS project. Add the following build script to package.json:
...
  "scripts": {
    "build": "GATSBY_EXPERIMENTAL_PAGE_BUILD_ON_DATA_CHANGES=true gatsby build --log-pages",
    ...
  },
...This enables a variable called GATSBY_EXPERIMENTAL_PAGE_BUILD_ON_DATA_CHANGES to be set to true prior to running any builds.
If you haven't done also already, add a netlify.toml file to the base directory of your project. Netlify looks to this file for various configurations, one of which happens to be enabling our Gatsby cache:
[[plugins]]
  package = "netlify-plugin-gatsby-cache"

[[plugins]]
  package = "@netlify/plugin-lighthouse"
  [plugins.inputs]
    audit_url = 'https://hackersandslackers.com'

# ...The plugin listed as "netlify-plugin-gatsby-cache" is actually an NPM package, so be sure to add that:
npm i netlify-plugin-gatsby-cache --saveLastly, add the plugin to gatsby-config.js:
module.exports = {
  plugins: [
   `gatsby-plugin-netlify-cache`,
	...
    ]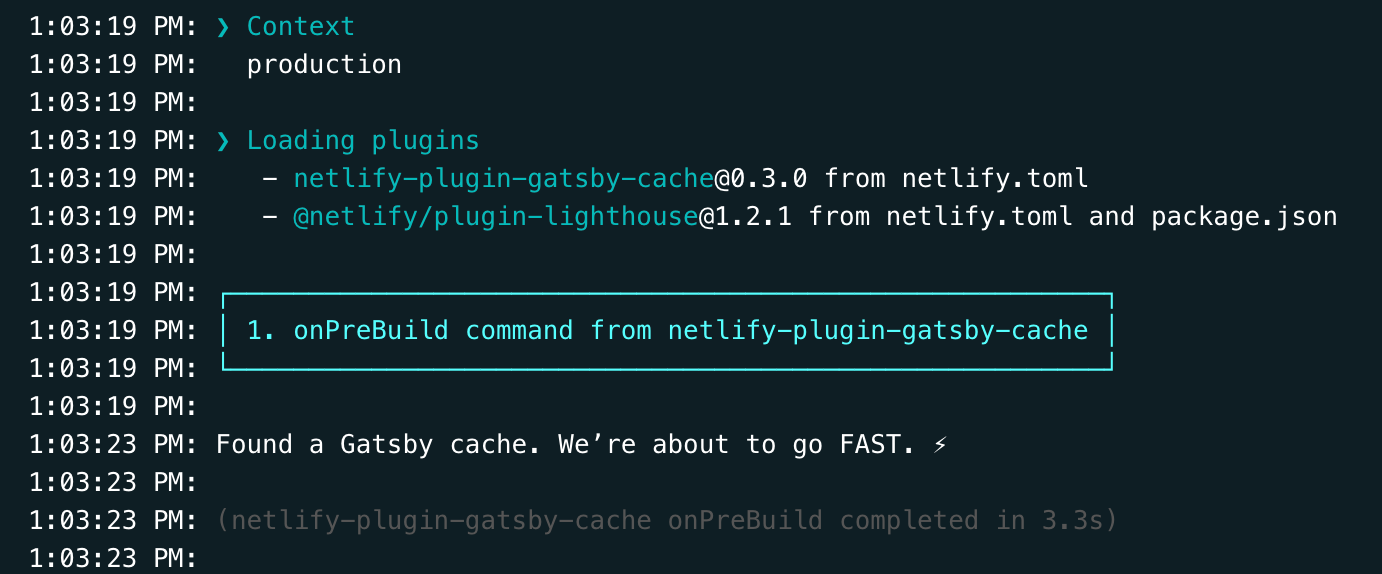
}Now each time you run a build, you'll see a nice message in your build logs tell you a cache has been found:
Upgrading Node and NPM
Sites living on Netlify are deployed as Docker containers, typically running Ubuntu 16.04. Netlify has silently been offering more control over customizing these images to give us the power to customize the environment we're running. The build images Netlify offers can be found in a public repo here.
Netlify's default Docker image ships with Node v8.X. Luckily for us, Netlify has reserved an environment variable which we can use to upload the version of Node and NPM in our container! The easiest way to accomplish this is by setting these variables via the Netlify UI:
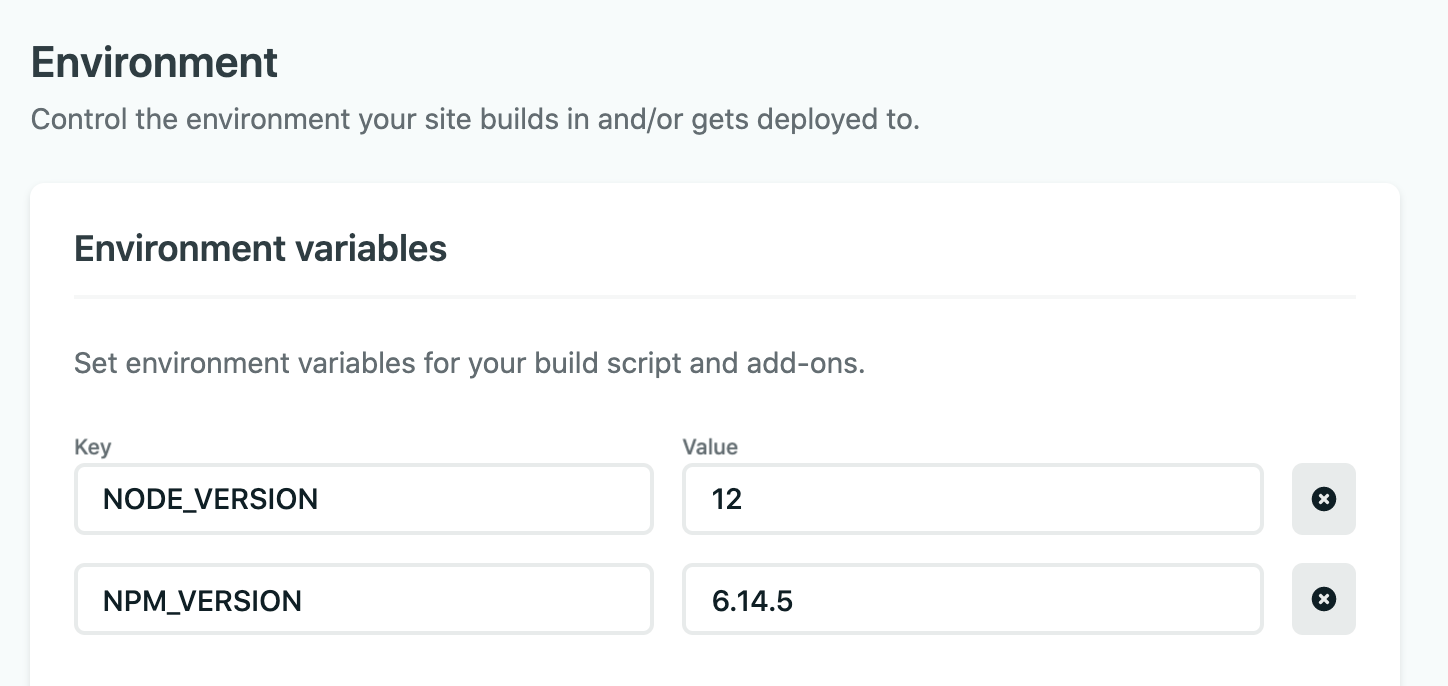
Yes, that's really all it takes! The versions we specify for NODE_VERSION and NPM_VERSION will be installed on our container the next time we create a build.
The next time your site builds, the deploy log will show that your newly specified versions were recognized and installed:
1:03:09 PM: Started restoring cached node version
1:03:12 PM: Finished restoring cached node version
1:03:12 PM: Attempting node version '12' from .nvmrc
1:03:13 PM: v12.18.1 is already installed.
1:03:14 PM: Now using node v12.18.1 (npm v6.14.5)Minify Static Assets
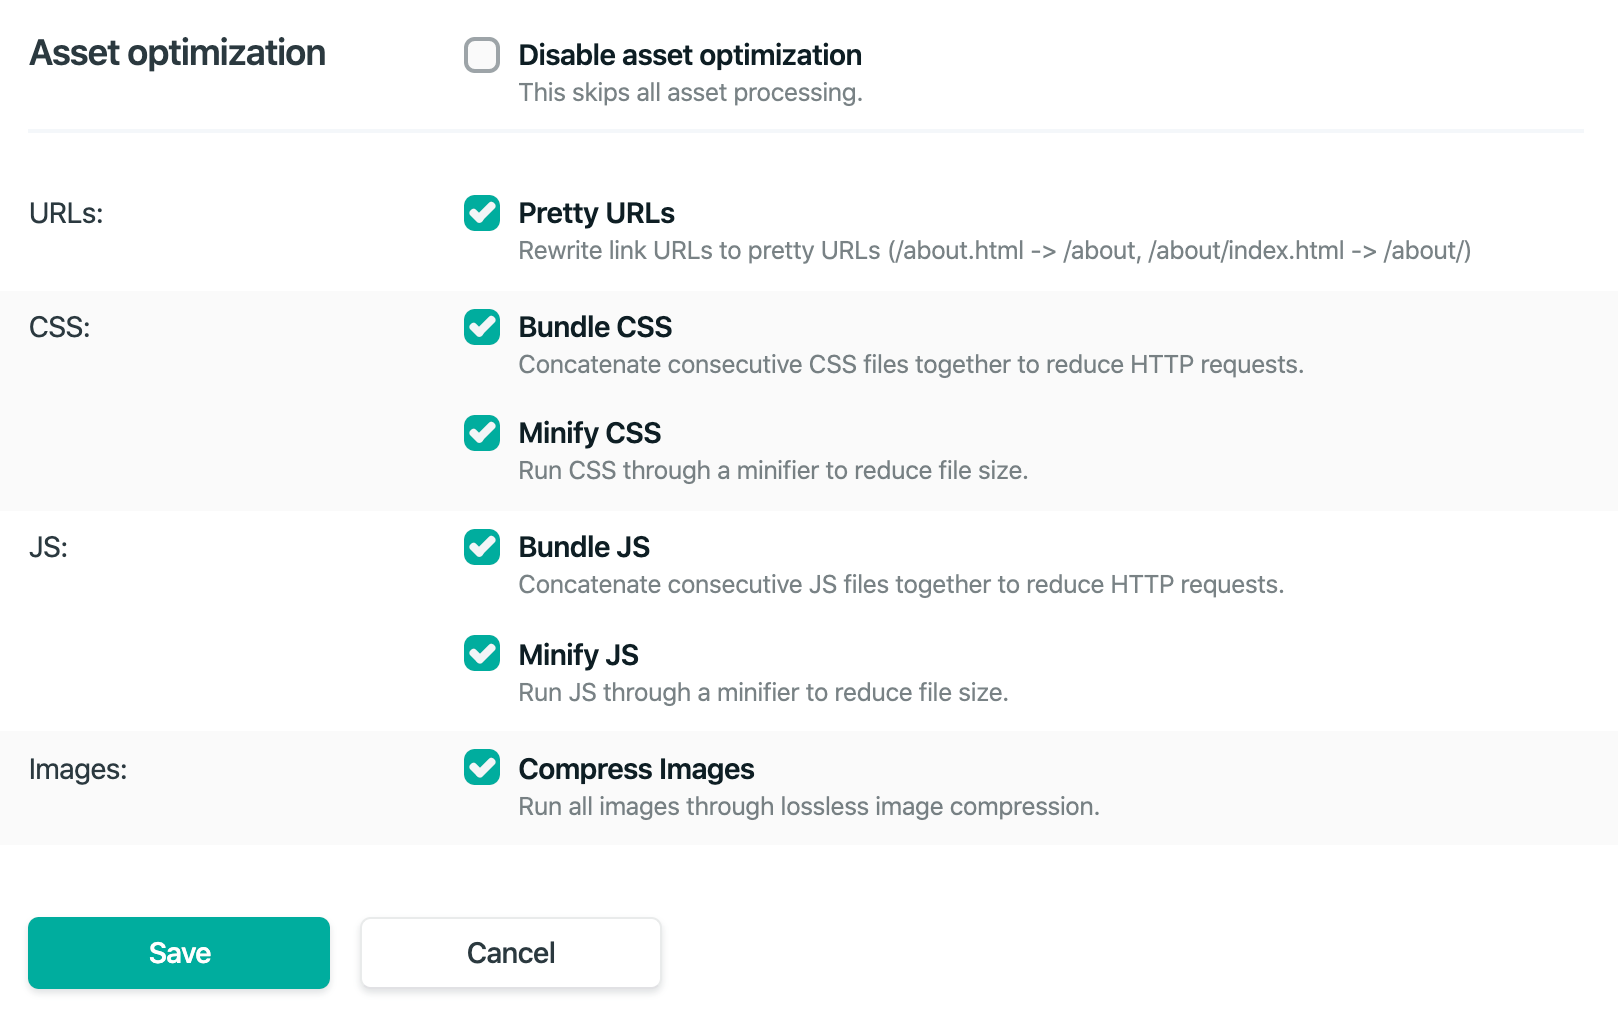
Netlify gives us the option to optimize frontend assets as part of every production build. As a part of every deployment, Netlify optimizes our build by:
- Handling the compression and bundling of JS & CSS
- Compresses images in our build using lossless compression
- Cleans URL routes to omit file extensions
The easiest way to enable asset optimization is via the UI:
Alternatively, we can accomplish the same effect by adding a Netlify config file to the home of our project called netlify.toml.
Fine-tuning netlify.toml
The configurations we've handled via Netlify's UI can alternatively be handled in netlify.toml. netlify.toml actually allows for even more optimization, so it's important to get a decent grasp on what we can accomplish with this, Here's an example:
# Global build commands
[build]
  command = "gatsby build"
  publish = "public/"
  functions = "functions/"

# Installed Netlify plugins
[plugins]]
  package = "netlify-plugin-gatsby-cache"

[[plugins]]
  package = "@netlify/plugin-lighthouse"
  [plugins.inputs]
    audit_url = 'https://hackersandslackers.com'

# Expects incoming webhook from my Ghost CMS
[template]
  incoming-hooks = ["Ghost"]

# Redirects Wordpress hacking trolls to an offensive image
[[redirects]]
    from = "/wp-login.php"
    to = "https://i.imgur.com/1Ia9tTG.gif"
    status = 301

# Simple redirect for a page which has changed URLs
[[redirects]]
    from = "/creating-endpoints-with-lambda/"
    to = "/create-a-rest-api-endpoint-using-aws-lambda/"
    status = 301

# Role-based redirects do not have a 'to' property.
[[redirects]]
  from = "/secret_admin"
  status = 200
  conditions = {Role = ["admin"]}
  force = true

# Headers to return with requests for the specified paths
[[headers]]
  # Define which paths this specific [[headers]] block will cover.
  for = "/*"

  [headers.values]
    X-Frame-Options = "DENY"
    X-XSS-Protection = "1; mode=block"

    # Multi-key header rules are expressed with multi-line strings.
    cache-control = '''
      max-age=31557600,
      no-cache,
      no-store,
      must-revalidate'''

# Asset optimization
[build.processing]
  skip_processing = false
[build.processing.css]
  bundle = true
  minify = true
[build.processing.js]
  bundle = true
  minify = true
[build.processing.html]
  pretty_urls = true
[build.processing.images]
compress = trueThere are three things here worth focusing on for optimization purposes:
- [[redirects]]: Netlify makes it very easy to set redirect routes for pages that have gone missing. In addition to this, a redirect can also be used to restrict access to certain pages of our site to users who match a specific role. The ease-of-use associated with created redirects is especially helpful if we pair this with Netlify's analytics offering, which we'll cover in a bit.
- [[headers]]: Setting response headers is (obviously) important for a lot of reasons, but one in particular is for the appeasement of Google's Lighthouse speed tests. In their own words, "HTTP caching can speed up your page load time on repeat visits. When a browser requests a resource, the server providing the resource can tell the browser how long it should temporarily store or cache the resource." The headers we've set in the above example satisfies this.
- [build.processing]: If you'd prefer to handle configuration of asset optimization in a config file, more power to you.
Netlify Analytics
Netlify offers a surprisingly good analytics dashboard service called Netlify Analytics, which has numerous benefits for site performance and optimization. That said, this product is not free which is understandably unacceptable for a large contingency of people. I'm not here to sell you services, but Netlify Analytics has numerous performance/optimization benefits for static sites, which we should not ignore.
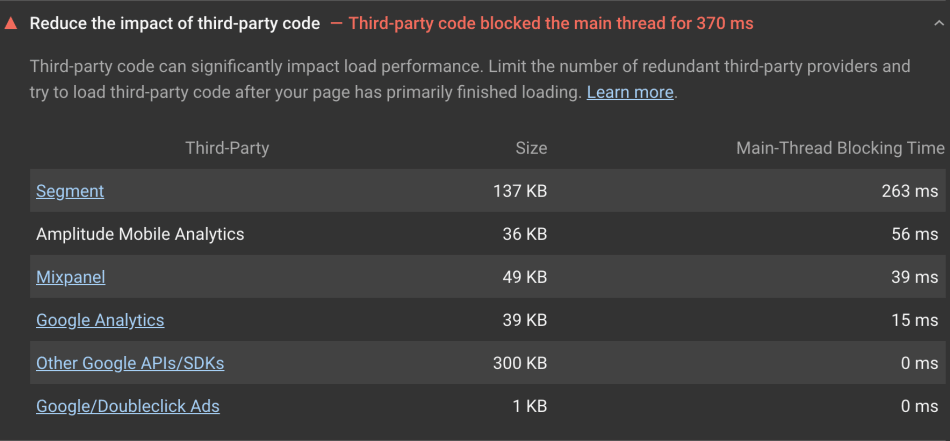
Unlike industry-standard analytics such as Google Analytics, Netlify Analytics adds zero overhead to page loads. In their own words:
Netlify Analytics will never impact the render time of your web applications since the work of capturing requests happens on our infrastructure, not in the browser.
As a comparison, here's the overhead my other analytics scripts are costing me:
|
Third-Party
|
Size
|
Main-Thread Blocking Time
|
|---|---|---|
| Segment |
137 KB
|
263 ms
|
|
Amplitude Mobile Analytics
|
36 KB
|
56 ms
|
| Mixpanel |
49 KB
|
39 ms
|
| Google Analytics |
39 KB
|
15 ms
|
| Other Google APIs/SDKs |
300 KB
|
0 ms
|
| Google/Doubleclick Ads |
1 KB
|
0 ms
|
Google Analytics alone adds 340KB to our page load, 301KB of which are unsolicited auxiliary scripts. That's so absurd that Google itself raises this is a critical problem. That's right folks, the above information came from my site's Lighthouse audit. There's something beautiful about Google products auditing other Google products and concluding that 300KB of unwanted surveillance is unacceptable:
Finding and Fixing 404 Errors
Perhaps the best feature of Netlify Analytics is a report of pages users are receiving 404 errors for. We can quickly define pages on our site which has disappeared or been renamed as users frequently fail to load said pages:
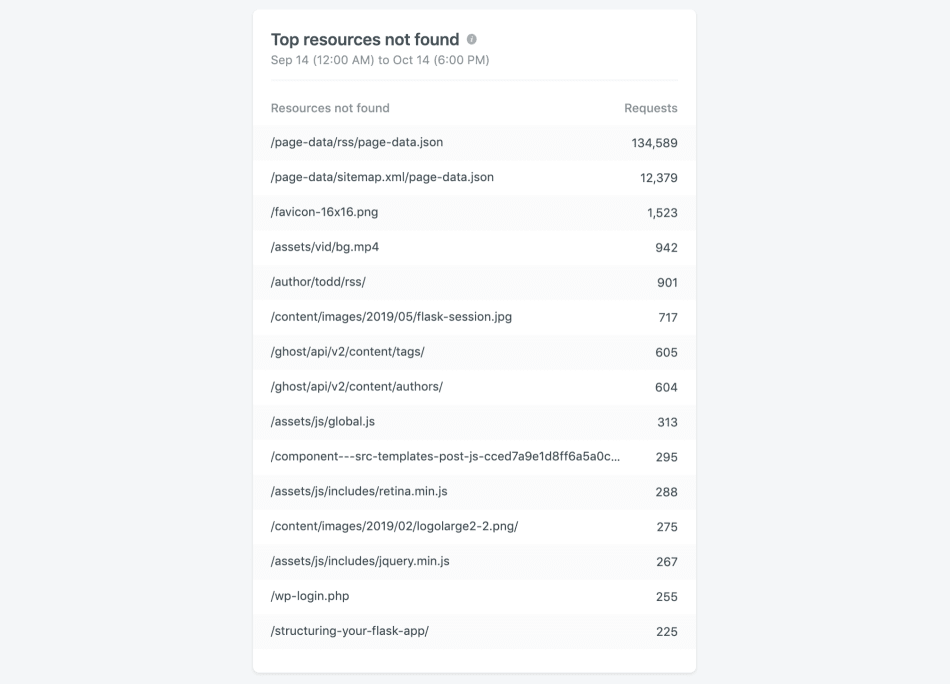
Thanks to netlify.toml, it's very easy to fix these issues by defining redirects to proper pages. We can also see hilarious hacking attempts as users try to hit common admin pages that don't exist. I recommend redirecting this traffic to a special place in hell.
Final Thoughts
For a hands-off hosting solution, Netlify allows us to have an impressive amount of control over how we fine-tune our static sites. While I've spent this time highlighting the benefits of Netlify as a service, I am legitimately concerned about Netlify's lack of competition. Netlify recently rolled out a "feature" where teams can view their past build history on a new "build" tab, which was announced as such:
We’re excited to introduce the new Builds tab to the Netlify dashboard, designed to give your team deeper insights into the powerful CI/CD functionality of the Netlify workflow. Now you can:
- See a centralized view of builds across your team and sites at a glance
- View the number of builds currently in progress or pending
- Investigate which builds succeed, which builds fail, and how long it takes for each build to deploy
- Dive deeper into the deploy summaries and logs for each build in one click
In reality, Netlify was actually releasing a way to charge users for exceeding a newly introduced "build minutes" limit. Netlify had previously provided build services for free. This changed without warning, and many customers suddenly found their sites held at ransom with the risk of suspension. The statement reads:
You are on the free Netlify Starter plan, which includes 300 minutes of build compute time per month. That’s quite a lot—more than you and the vast majority of our free users are currently consuming. We’ve always provided generous features in our free tier, including custom domains and deploy previews, and you’ll see our approach to build minutes is no different.
Gatsby builds routinely take up to 10 minutes. 300 minutes is not "quite a lot" by any stretch of the imagination. I've never needed to monitor monthly "build minutes" before, nor has anybody else in history; I'd wager. The allure of sites on the JAMStack is constant automatic builds. If a build is triggered every time an author on our site corrects a spelling error, we're looking at hundreds of builds per month.
All that said, I'm clearly still a fan of Netlify (I don't write long-winded posts about products I dislike). There are worse things than being locked into Netlify, and hopefully you've found something in this post to make your site is a little better.