There isn't much I can say that hasn't already been said about Django: the granddaddy of all web frameworks. I owe a large part of my engineering career to learning Django on a whim in 2012. Django was a surprisingly elegant take on MVC, written in a programming language that was far from mainstream at the time of Django's inception. Most of us have surely forgotten what it was like to learn 1) a programming language, 2) a framework, and 3) an entire programming paradigm, all at the same time. In the face of that challenge, Adrian Holovaty and Jacob Kaplan-moss produced a phenomenal book dubbed The Definitive Guide To Django, which artfully articulated all of those things simultaneously. I believe the book is now either free or serves as Django's official documentation. Without those who created Django and championed its mainstream popularity, our website of sloppy Python tutorials surely would not exist today.
To say a lot has happened since 2012 would be the understatement of the decade. Staying within the topic of software, some might remember the prophecy of Ruby on Rails eating the world. It was a popular sentiment that coincidentally took rise while Guido Von Rossen enraged the Python community with the announcement of Python 3 (which was, for the record, a completely necessary and reasonable course of action). My condolences to the families of developers lost to traumatic finger injuries, as they were forced to rewrite their print statements to include parenthesis. Pessimistic commentary surrounding the future of Python (and Django) was everywhere- even our elitist Hacker News overlords couldn't help themselves from the phrase “Python is dead” (which I wholeheartedly hope somebody takes the time to create a meme collection of). It was a comedy of short-sighted hyperbole, or in other words, typical software engineer banter. That's around the time when #TeamRuby collapsed harder than the Soviet Union. The timing of new NodeJS frameworks served as safe havens for refugees: lucky JavaScript developers now have an infinite supply of soon-to-be obsolete frameworks to spend the rest of their lives with.
So why start writing Django tutorials now? I've had a very public and notorious love affair with Flask for well over a year now... how does Django fit into this love triangle? Is this considered cheating?
Let's consider the top complaints developers have about their profession. Perhaps the most common (and painfully cliche) complaint is that software professionals are pressured to learn "countless frameworks" to stay relevant in the industry. That sure feels like an unfortunate fate when compared to the non-technical office worker, who has learned exactly zero frameworks. Is there legitimacy to this complaint? Well, let's start by looking at how a sample of how MVC frameworks have fared over the past six years:
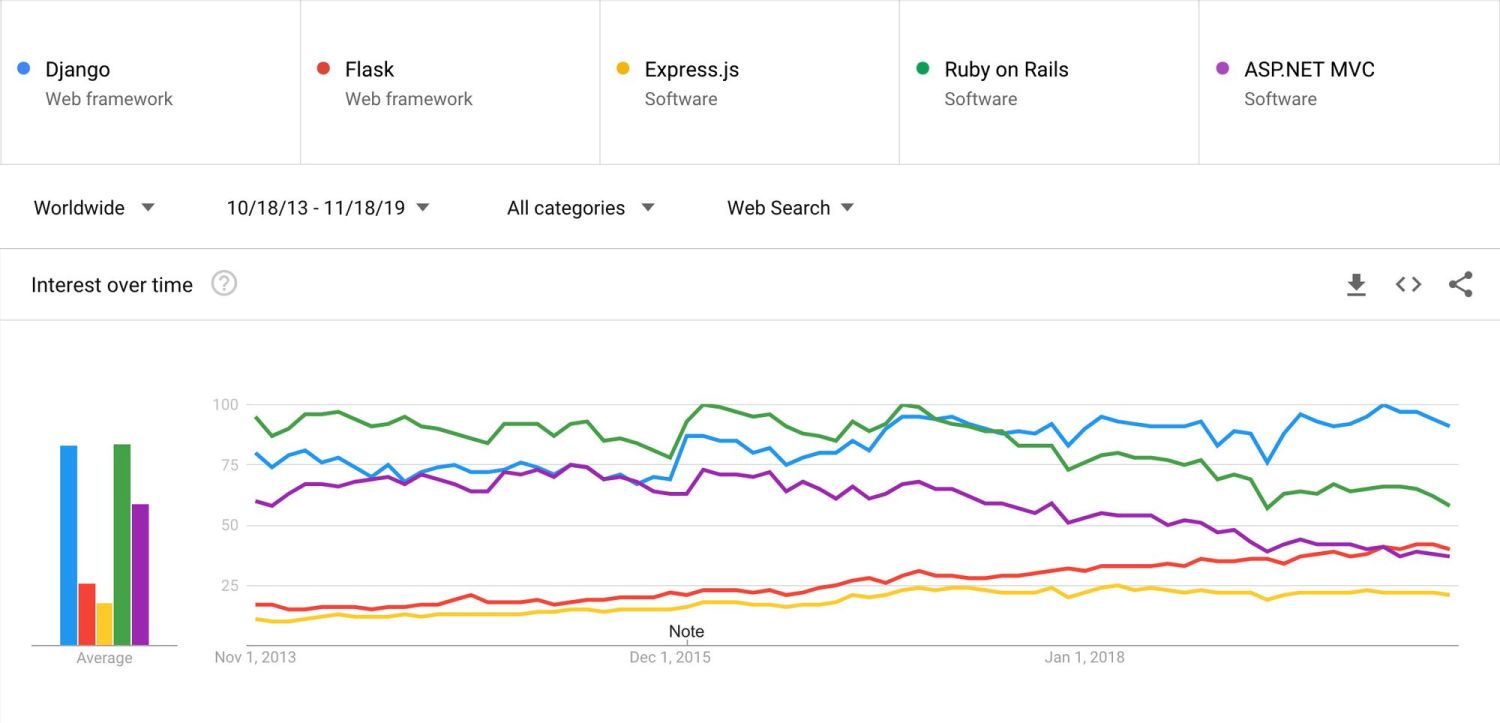
Google search trends aren't flawlessly scientific, but it's hard to deny Django's resilient popularity. Django is the only example in this sample that is highly relevant in both 2013 and 2019, and actually gains interest over time to steal the #1 most Googled MVC framework in 2019. Different surveys will tell narratives, but there's an undeniable truth worth recognizing: if a software developer spent their entire career developing exclusively in Django, they could comfortably retire from a successful career having learned only a single framework. In fact, any of us could have chosen to do so, and still can. The mystery of human nature instead leads down self-destructive paths, hurting ourselves with diseases like Angular, or even worse, ASP.NET.
Anyway, welcome to Django 101. This post is the first in a series where we dissect Django from top-to-bottom for people in 2019. If you've ever felt the hopeless feeling that the world has an unfair 10-year head start doing something you love, this series is for you. Welcome to the family.
A Note About Django Vs Flask
This comparison is bound to pop up, so let’s get it out of the way.
Flask’s claim to fame is its zero-configuration quick-start, which contains seven lines of code and exactly zero bells and whistles. Flask prioritizes ease-of-entry over features, where “features” are plugins (AKA Flask-specific Python libraries).
Django is the antithesis of Flask’s “as-you-go” philosophy of development. Batteries are included with Django to the extent that Django’s batteries have batteries of their own. No amount of imagination could fathom a paradigm that Django doesn't handle out of the box.
Flask is akin to the lean startup advocating agile, whereas Django is equivalent to an Enterprise behemoth in denial about using waterfall (this analogy is also a pretty accurate manifestation of who-uses-what). I’ve found Flask to have a much easier learning curve, partially because Flask is far less rigid than Django. Flask projects inherently have no sense of structure, whereas Django forces developers into an organized paradigm. Flask projects have the ability to be structured similarly to Django, but cohesiveness becomes highly unlikely as your development team approaches hundreds of devs. This reason alone enough to perpetuate an assumption you probably already have: “Django for large projects, Flask for small projects.” I’m not suggesting this is entirely accurate, but it isn’t inaccurate either.
Getting Started
The goal of this tutorial is to create the simplest possible Django application that provides some sort of value. Learning to print “Hello world” is fine, but it’s kind of a useless exercise in terms of learning the internals of a Framework. We’ll instead focus on building an application that serves a single HTML page. It doesn't sound like much, but you should walk away with a grasp of the following:
- Installing and running Django locally
- Configuring Django settings properly
- Creating and managing “app” modules
- Serving templates via Django’s native templating system
- Styling templates with static assets
- Routing in Django
To make things interesting, I’ll be walking through this with Django 3.0, which was actually released two days ago. You could very well be reading the first Django 3 tutorial ever written*.*
We’re going to be running Django locally for the purpose of this tutorial. If you’re looking for details to set up Django on Ubuntu, I'd start here.
Installing Django in a Virtual Environment
As always, we want to set up a virtual environment for our project before installing Python packages. Feel free to use whichever Python virtual environment you're comfortable with; I'm personally going to use Pipenv.
cd into the directory you'd like to start your app in and create your virtual environment:
# Create virtual environment
$ python3.8 -m venv .venv

# Activate virtual environment
$ . .venv/bin/activate

# Install django in virtual environment
$ pip install django Now we have an active virtual environment with Django installed. Just to make sure everything is fine, run the following line to check the proper version of Django was installed:
$ python3 -m django --version
>> 3.0We're ready to rock. Lucky for us, Django has a built-in command called django-admin to help us generate our first project (amongst other things we'll explore later). To generate the scaffolding for our project, we invoke one of django-admin's methods called startproject:
$ django-admin startproject [YOUR_PROJECT_NAME]Boom, we just started our first project! My project happens to be called djangotutorial. Let's see what's inside.
Anatomy of a Django App
The first key to understanding Django is understanding the pieces that make it work. Here are the "pieces" we created by starting our project:
/djangotutorial
  ├── /djangotutorial
  │   ├── __init__.py
  │   ├── settings.py
  │   ├── urls.py
  │   └── wsgi.py
└── manage.pyOur new project contains one file and one directory. We'll touch on what purpose manage.py serves in a moment, but let's first address the glaring question: is why there a folder called djangotutorial in our project called djangotutorial? It’s as though we just started a band called Iron Maiden, created a song named Iron Maiden, and featured it on our new album: Iron Maiden. It seems strange, but this begins to make sense as we unravel how Django apps scale.
Django projects are designed to be large by design: a single Django project is intended to consist of modules, or as Django calls them, “apps”. Let’s see what a mature Django project with multiple “apps” might look like:
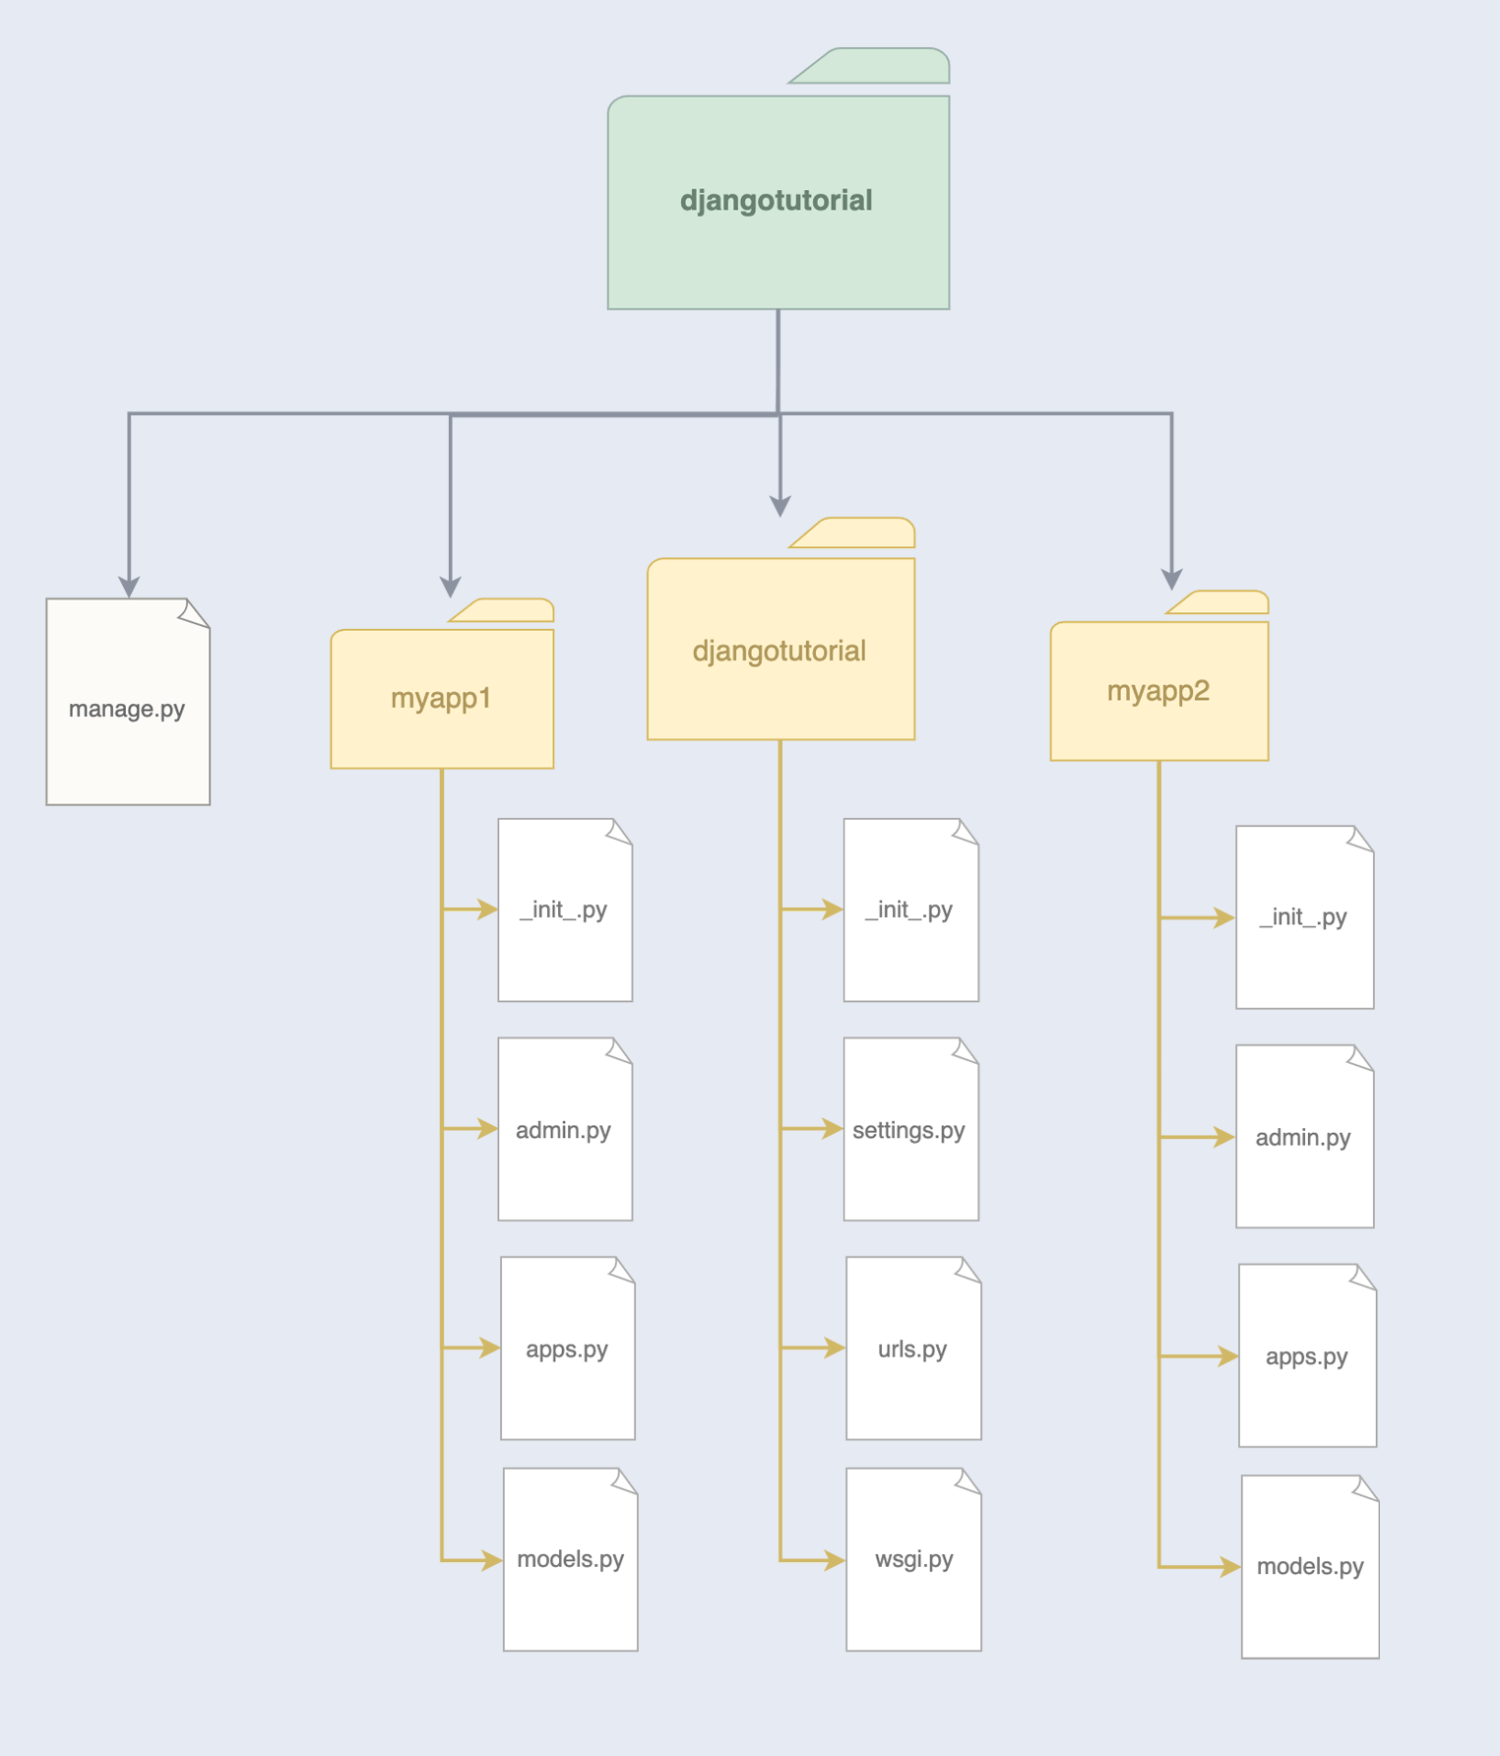
It’s best to think of a Django "app” as a subsection of your project that serves a general purpose. Think along the lines of a checkout flow for an e-commerce site, or logged-in user profiles: both of those examples would probably consist of multiple pages, but share common logic and assets between those pages.
One of our apps always shares the name of the parent project. This app contains the “core” of our project: it serves as the entry point, which ties our other apps together and holds settings common to all of our apps, such as database information. It would be fairly accurate to state Django projects are a collection of app “nodes,” where djangotutorial is our “master node.” Here's what's inside:
- settings.py handles everything imaginable related to configuration. This is where we activate Django plugins, store database credentials, set our hostname, etc. This is usually the type of file you don't want to commit to Github (or if you do, make sure to obscure the credentials).
- urls.py is where we set the top-level URLs for our projects. Remember: Django projects are intended to be broken up into individual modules, so this file usually reserves a URL for each module, with modules handling their own independent URL routers.
- wsgi.py where we point webservers like Nginx, Caddy, or whatever to serve our site. You'll probably never need to touch this.
manage.py
We briefly glossed over the other thing created we created when we ran django-admin: manage.py. This file is the key to the kingdom: it contains logic covering everything related to “managing” our project. For example:
python3 manage.py runserverdeploys our app in "development mode" so that we may access it via our browser (this will be accessible via localhost by default).python3 manage.py migrateupdates your project's database tables to match the data models you've defined.python3 manage.py startapp [MY_APP_NAME]is the equivalent ofdjango-admin startproject [YOUR_PROJECT_NAME]. Indeed, django-admin is simply an alias for manage.py!
Definitely check out what manage.py can do by running python3 manage.py --help
So far, all our app can do is serve a generic canned page confirming that Django was installed correctly. Let's confirm all is good:
$ python3 manage.py runserver

Watching for file changes with StatReloader
Performing system checks...

System check identified no issues (0 silenced).
December 04, 2019 - 23:18:54
Django version 3.0, using settings 'djangotutorial.settings'
Starting development server at https://127.0.0.1:8000/
Quit the server with CONTROL-C.
Now open your browser and check out https://127.0.0.1:8000/:
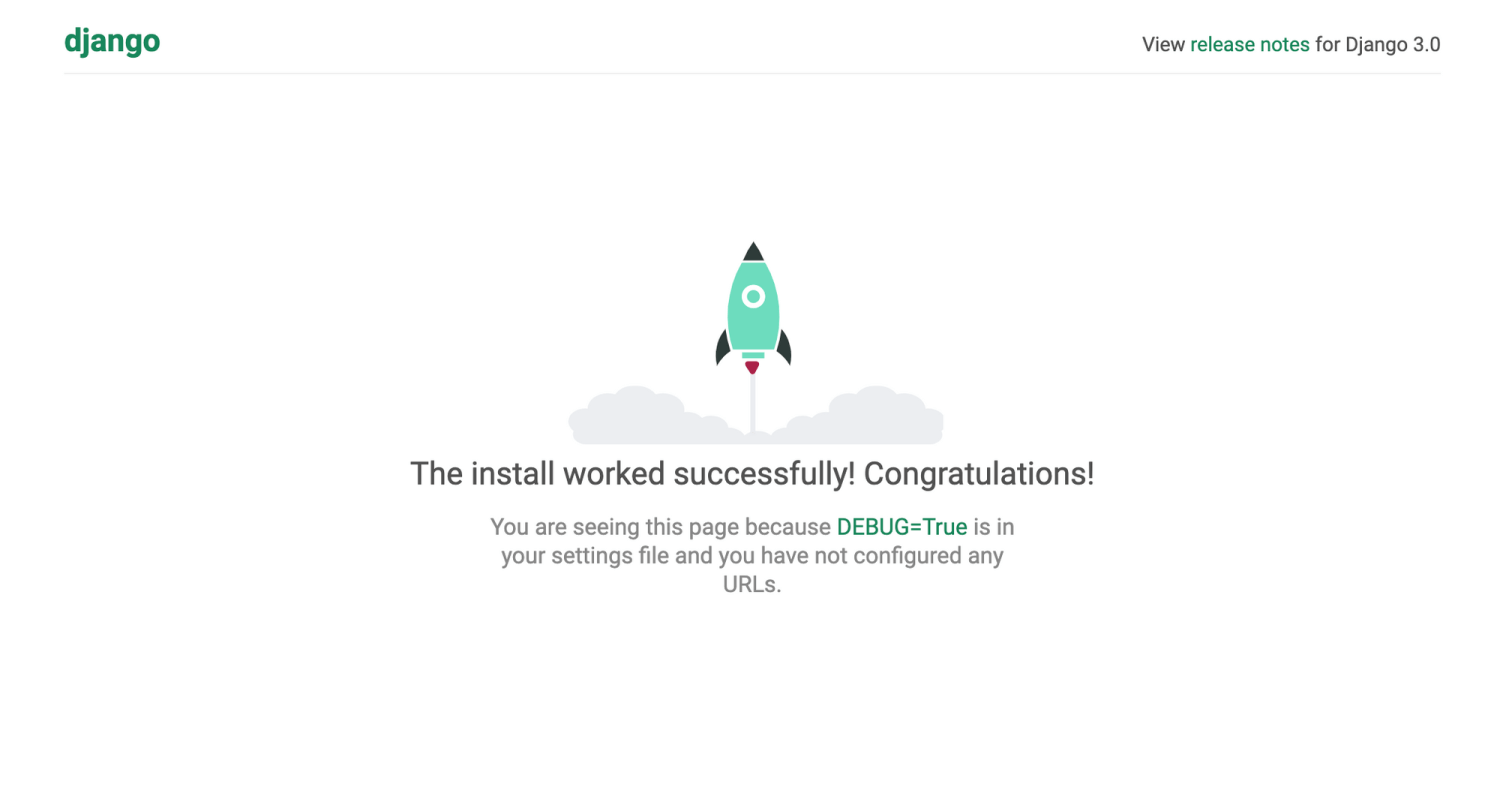
Seeing this page is a beautiful thing, but we’ve only barely started to lay the groundwork for a respectable app. Django development truly begins with its configuration, but don't gloss over this just because it sounds boring: setting up Django reveals everything about how the framework works as a whole.
Settings.py: The Heart of Django
The top section of settings.py contains configuration variables that Django absolutely depends on to function. Without any modifications, this section should look as follows:
import os

# SECURITY WARNING: keep the secret key used in production secret!
SECRET_KEY = '$HVG687rTFDuYdtfg8yiuf87fuib&)lw#6btg5_p'

# SECURITY WARNING: don't run with debug turned on in production!
DEBUG = True

ALLOWED_HOSTS = []

# Application definition
INSTALLED_APPS = [
    'django.contrib.admin',
    'django.contrib.auth',
    'django.contrib.contenttypes',
    'django.contrib.sessions',
    'django.contrib.messages',
    'django.contrib.staticfiles',
]

...SECRET_KEY is a concept you might already be familiar with: in short, this is a random string of characters that Django uses to encrypt sensitive information passed around the app. This is automatically generated for you, but please, for the love of Steve Buscemi, just don't share it with anybody.
Sometimes we make mistakes when writing code, and it isn't always easy to figure out what when wrong. With DEBUG enabled, any parts of your app which throw errors will serve you a detailed error report of what went wrong.
ALLOWED_HOSTS seems comically understated, as it is the most important variable we to get Django working. When Django is running, ALLOWED_HOSTS serves as a whitelist for which traffic pointing to your app it will actually acknowledge. You could have Nginx perfectly configured to point to your Django app, but if the traffic source from Nginx isn't present in ALLOWED_HOSTS, your app will not be accessible.
We're going to run our app locally, so we should include "hosts" synonymous with your local machine:
ALLOWED_HOSTS = [
    '0.0.0.0',
    '127.0.0.1',
    'localhost',
    '127.0.0.1:8000'
]It's a bit curious that hosts like localhost aren't present here by default. Whatever.
If you were building an app to be served at a domain like example.com, you'd include that hostname in your allowed hosts like so:
ALLOWED_HOSTS = [
    '0.0.0.0',
    '127.0.0.1',
    'localhost',
    '127.0.0.1:8000',
    'example.com'
]Next in our configuration is INSTALLED_APPS. This one is a doozy; remember when we mentioned Django being a collection of modules called "apps"? When we create an app in Django, we need to add it to INSTALLED_APPS to be recognized and served in our project. The admittedly strange part about this is that Django considers its own core features to be called "apps" as well, which is why we see things like Django's admin library pre-populated here. It's not intuitive. We'll come back to this after making our first "app" in a moment.
Setting up a Database
Django wants you to configure a database upfront, even if you aren't going to use it right away. In fact, running manage.py runserver without setting a database will automatically create an SQLite database by default. That's because the database section of settings.py starts off like this:
...

# Database
DATABASES = {
    'default': {
        'ENGINE': 'django.db.backends.sqlite3',
        'NAME': os.path.join(BASE_DIR, 'db.sqlite3'),
    }
}

...
Take special notice of the ENGINE key and how it specifies that we're using an SQLite database. This is Django using its internal SQLite connector to connect to our database. We aren't limited to SQLite, however; any of the following database flavors are supported out of the box:
'django.db.backends.mysql'(includes MariaDB in Django 3)'django.db.backends.postgresql''django.db.backends.sqlite3''django.db.backends.oracle'
We won't be needing a database for our intro app, but if we hypothetically wanted our app to use a MySQL database, our config might look something like this:
...

# Database
DATABASES = {
    'default': {
        'ENGINE': 'django.db.backends.mysql',
        'NAME': 'myDatabase',
        'USER': 'root',
        'PASSWORD': 'password123',
        'HOST': '534.13.356.35',
        'PORT': '3306',
    }
}

...Even though we specify 'ENGINE': 'django.db.backends.mysql', we still need to install the MySQL connector that Django expects, which happens to be mysqlclient. I don't understand why, and I'd rather move the reasons why this is annoying:
$ pip3 install mysqlclientLogging
Configuring logging is optional, but I'd recommend configuring this to keep a record of things gone wrong. Feel free to steal my configuration below:
...

# Logging
LOGGING = {
    'version': 1,
    'disable_existing_loggers': False,
    'handlers': {
        'file': {
            'level': 'DEBUG',
            'class': 'logging.FileHandler',
            'filename': 'logs/debug.log',
        },
    },
    'loggers': {
        'django': {
            'handlers': ['file'],
            'level': 'DEBUG',
            'propagate': True,
        },
    },
}

...Static Files
In the spirit of backend developers disrespecting frontend code, Django refers to all frontend code (such as JS, CSS, images, etc.) as "static files." The term seems to imply that the product of frontend development is an afterthought to be tossed into a folder and forgotten, but whatever; we backend developers aren't exactly heralded for our camaraderie or social skills.
We'll keep all static files in one place for the purposes of our app, but it's otherwise somewhat common for Django apps to each contain their own styles and JavaScript. Our simple configuration looks like this:
...

# Static files (CSS, JavaScript, Images)
STATIC_URL = '/static/'
STATICFILES_DIRS = [
    os.path.join(PROJECT_DIR, "static")
]

...This means that our "master node" app, djangotutorial, will host all of our CSS and what-not in a subdirectory called /static.
Extra Settings
There are many more things we could add to settings.py ranging from email settings, file uploads, security tokens, and whatever. If you'd like to explore those things, be my guest and read the documentation. The one variable I will call out, however, is APPEND_SLASH. Enforcing slashes on URLs is dope as hell, so you should do this unless you're some kind of weirdo:
APPEND_SLASH = TrueTemplates and Static Assets
Quick recap: Django projects are made up of modules called "apps." Of these apps, there is always a "master" app that contains settings, logic, and anything to be shared across all child apps.
Page templates and static assets are among the things we can choose to share between apps in a Django project: If every part of our project is going to share the same base styles or the same HTML meta headers, we can opt to keep those things in tutorialapp for our other apps to use. We'll keep our site-wide styles and images in a directory named /static, and our base page template in /templates.
Our Base Page Template
If you aren't familiar with page templating systems like Handlebars or Jinja, I'm gonna have to leave you in the dark here to keep moving. Take a few minutes to read up on Jinja when you can.
Every page of most sites shares roughly the same boilerplate of meta tags and so forth. Instead of duplicating boilerplate every time we make a new page, we'll create a "base" page called layout.html which we'll use to load other page templates into:
{% load static %}

<!DOCTYPE html>
<html lang="en">

<head>
<title>{{title}}</title>
  <meta charset="utf-8" />
  <meta name="description" content="This is a description">
  <meta name="HandheldFriendly" content="True" />
  <meta name="viewport" content="width=device-width, initial-scale=1.0, viewport-fit=cover" />
  <meta name="theme-color" content="#5eb9d7">
  <link rel="apple-touch-icon" href="icon.png">
  <link rel="stylesheet" href="https://use.typekit.net/uqq2lcv.css">
  <link href="{% static 'css/styles.css' %}" rel="stylesheet" type="text/css">
</head>

<body class="{{template}}">
    {% block content %}{%  endblock %}
</body>

</html>
{% load static %} tells Django to look for our static files in our static folder. It's a bit redundant, but whatever. Once that's done, we can load in assets like stylesheets as we do with {% static 'css/styles.css' %}
With that done, djangotutorial now looks like this:
/djangotutorial
├── /static
│   ├── /css
│   │   └── styles.css
│   └── /img
│       └── logo.png
├── /templates
│   └── layout.html
├── __init__.py
├── settings.py
├── urls.py
└── wsgi.py
/djangotutorial directoryMaking a Django "App"
We're roughly 3000 words deep into this tutorial and we haven't even written any meaningful logic yet. I wasn't kidding when I said Django was rigid, but the good news is getting set up is the hardest part: everyday Django development is far more straightforward than what we've dealt with so far.
cd back into the top-level directory which contains manage.py. We'll create our first app by using this command:
$ django-admin startapp [YOUR_APP_NAME]Now we can start writing actual business logic. Remember: our goal is to serve a single-page application. Eyes on the prize here, folks.
I used the startapp command to create a Django app named myapp. Here's what came out of it:
/myapp
  ├── __init__.py
  ├── admin.py
  ├── apps.py
  ├── /migrations
  │   └── __init__.py
  ├── models.py
  ├── tests.py
└── views.pyModels? Views? Things are starting to feel more MVC already. Here are the broad strokes of what makes a Django app tick:
- models.py is where we'd store database models for Django's ORM. For the scope of this tutorial, we aren't going to bother with database interactions. By the time we actually manage to serve a page template, we'll both be too burnt out to function anyway.
- views.py is where we handle building and serving "views" to users - more on this in a moment.
- urls.py is actually missing here, but it's expected that any Django app intending to "serve" pages or endpoints will have them. Setting "urls" is equivalent to setting routes: this is where we tell Django to serve view X when visiting URL Y.
To make our first page, we'll start by creating a view in views.py.
Creating a Homepage
A view is simply "something to serve to a user at a given URL." When a user requests a URL from whichever domain Django is hosted on, Django looks through its collection of routes (the stuff in urls.py) to see if the requested URL is associated with a view. If an association exists, Django passes information about the requester to the view function, and the user is served a response (like a web page). Here's what a simple view looks like:
from django.shortcuts import render


def index(request):
    context = {
        'template': 'homepage',
        'title': 'My Django App',
        'description': 'You\'ve launched your first Django app!'
    }
return render(request, 'myapp/index.html', context)The only "magic" happening here is thanks to two things Django provides to us: the request object and the render function:
- request is an object inherently passed to a view whenever a view is requested.
requestcontains metadata about the incoming request such as headers, parameters, HTTP method, etc. Most views would use this metadata as a way to serve responses contextually, but we're not going to do anything special today. - render builds a response to serve users. In this case, we're returning a page template called index.html, as well as a few variables to render with our page dynamically.
So our view is set to return a template at myapp/index.html, but that template doesn't actually exist yet. We need to create a templates folder in our "myapp" module. Django looks for templates here in a way that isn't entirely intuitive. Check out our app's folder structure after we add a template and corresponding stylesheet:
/myapp
├── /templates
│   └── /myapp
│       └── index.html
├── /migrations
│   └── __init__.py
├── __init__.py
├── admin.py
├── apps.py
├── models.py
├── tests.py
└── views.pyYes, our /templates folder contains a subdirectory named /myapp, which matches the name of the Django app. This a Django thing, and it's admittedly a bit confusing.
Moving on to index.html, all we need to do here is extend the layout.html template we made earlier and fill in some content. We'll load in the attributes we passed in our view to keep things interesting:
{% extends 'layout.html' %}
{% load static %}

{% block content %}
    <div class="card">
        <img src="{% static 'img/logo.png' %}" alt="logo" class="logo" />
        <h1>Hello world!</h1>
        <p>{{ description }}</p>
    </div>
{%  endblock %}
Values in double brackets ({{title}}, {{template}}, and {{description}}) will be replaced with the values of the matching keys in the dictionary we created in our index view. Then, the entirety of our block named "content" will get loaded into the space we reserved in layout.html for the very same block name.
Setting a URL Route
myapp now has a view, as well as a corresponding template. The only thing missing is specifying which URL should route to this view. Go ahead and create urls.py:
from django.urls import path

from . import views


urlpatterns = [
    path('', views.index, name='index'),
]urlpatterns is a list of paths, where each path consists of three parameters:
- The URL pattern to serve our view at. This always takes the form of a regex pattern. In our example, we want our view to be the homepage, therefore providing an empty string tells Django to serve our view at our site's root.
- The view we created in views.py. This is the view that will be served to the user when visiting the URL pattern specified above.
- The "name" of our route. Giving our route a name is an easy way to reference URL patterns later on.
urls.py allows us to set different URLs pointing to the same view, meaning we can serve the same view at different URLs. For example, here's how we can expand urlpatterns to serve the same page at different URLs:
...

urlpatterns = [
    path('', views.index, name='index'),
    path(r'^home/$', views.index, name='index'),
    path(r'^home/(?P<user>\w+)$', views.index, name='index'),
]Django will now respect three different routes to serve our homepage: /home, /home?user=todd, and our root (aka /). The last example is a way to specify query string parameters to our view, which is a good way to offer context to our views for more dynamic content.
It's worth noting that we're allowed to specify the same name for each of these routes, even though they can technically accept URLs.
Activating myapp
Our app is almost ready! There's one thing left to do... remember the list of INSTALLED_APPS that lives in settings.py? We still need to add our app here before Django respects it:
...

# Application definition
INSTALLED_APPS = [
    'django.contrib.admin',
    'django.contrib.auth',
    'django.contrib.contenttypes',
    'django.contrib.sessions',
    'django.contrib.messages',
    'django.contrib.staticfiles',
    'myapp',
]

...We're almost there, folks. Our app is good-to-go, and it's been sufficiently "installed." The only thing left is to tell our core Django app to listen to the URLs myapp/urls.py in our main module. To do this, we need to modify our core Django app's urls.py to look something like this:
from django.contrib import admin
from django.urls import path, include


urlpatterns = [
    path('admin/', admin.site.urls),
    path('', include('myapp.urls')),
]This probably seems confusing as shit, but the good news is we're done! Let's wrap our heads around this before we see our app in action.
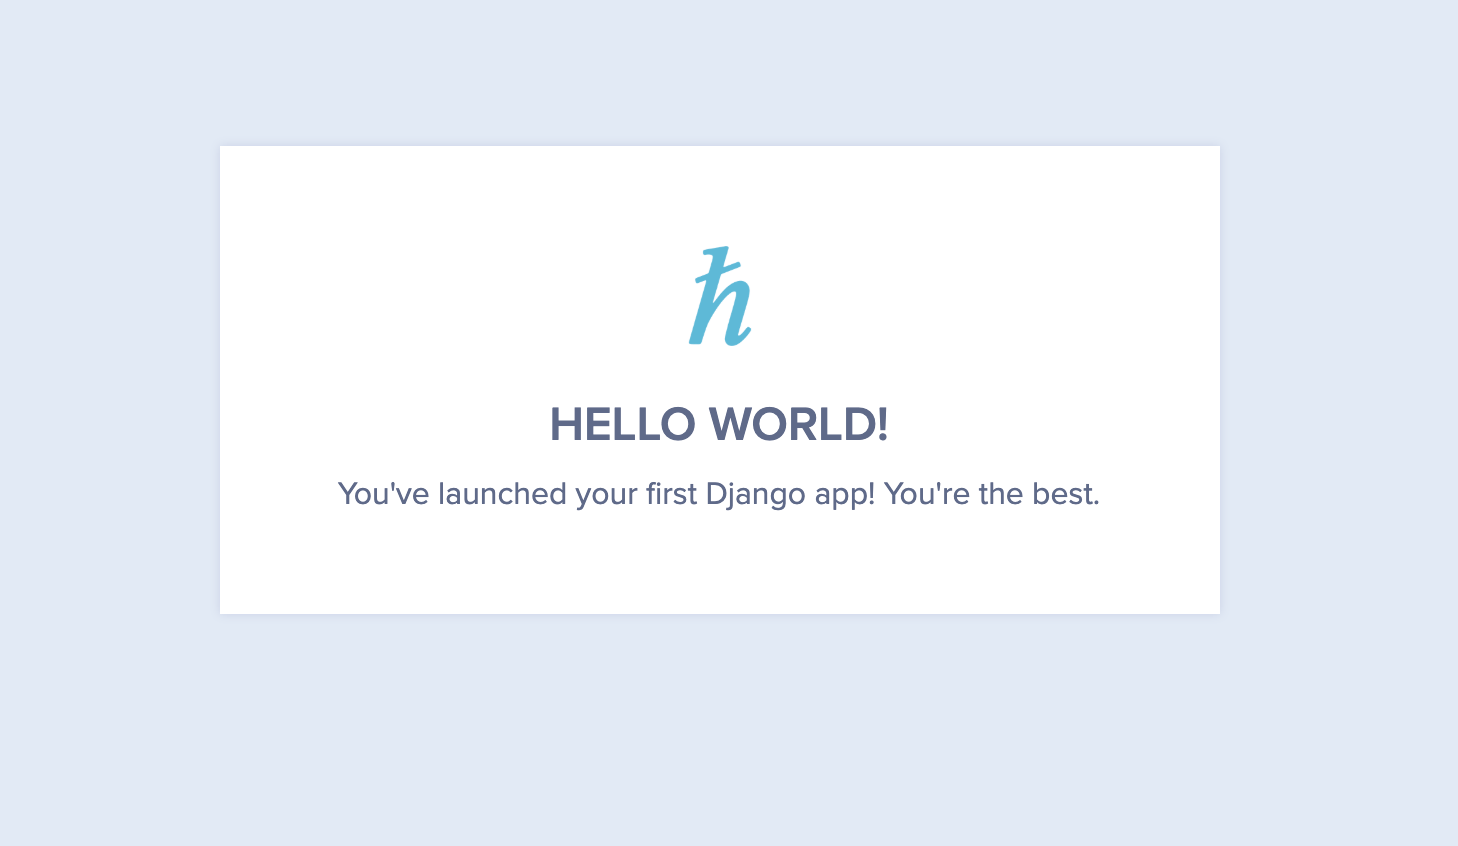
Any time a user visits our deployed Django server (at 127.0.0.1:8000 in our case), our "master app" djangotutorial picks up the incoming traffic. djangotutorial compares the URL the user provided to its list of URLs in urls.py, and if a match is found, the user is then directed accordingly. In our example, we're expecting users only to visit the homepage (AKA the root directory, AKA /), which is why our URL is seen as an empty string. Our urls.py file tells djangotutorial to defer traffic coming to this URL to myapp, which then takes over from there. The end result is effectively a route that points to another route, which points to a view, which happens to serve our homepage. Run python manage.py runserver to see for yourself:
I Hope Somebody Actually Read This
I've you've managed to survive this long, you're probably feeling a lot of emotions right now. Fatigue, pride, confusion, hope... perhaps all of the above. This is normal, especially if you happen to be a newcomer to MVC (in which case I'm sorry that you landed here of all places).
Make no mistake: Django is no joke. The power of a fully-featured web framework comes with a lot of shit to unpack, but the feeling of overwhelming complexity fades quickly as these patterns become more familiar. As with all things software-related, it takes a bit of fussing around before the concepts of Django truly "click." For that reason, I've gone ahead and uploaded the source code for this tutorial to Github for you to pull down and mess around with. You might just be surprised by what you come up with.