
Technology companies have seen plenty of trends in the last decade, such as the popularity of "Python shops" and a self-proclaimed notion of being "data-driven." Conventional logic would suggest that there are probably many more "data-driven Python shops," but that manifested in reality. Data pipelines are increasingly synonymous with the Hadoop/Spark ecosystems, whether by design or habit.
For the rest of us, there's Airflow: the OG Python-based pipeline tool to find its way into the Apache Foundation that has enjoyed wild popularity. If you're a data engineer looking to break free from the same old, Airflow might be the missing piece data engineers need to standardize and simplify your workflow.
What's the Point of Airflow?
Airflow provides countless benefits to those in the data pipeline business. It's not too crazy to group these benefits into two main categories: code quality and visibility.
Airflow could be described as a 'framework' for creating data pipelines. As a web framework helps developers by abstracting common patterns, Airflow fills a similar need for data engineers by providing tools to trivialize repetition in pipeline creation. Airflow has numerous powerful integrations that serve almost any need when outputting data. By leveraging these tools, engineers see their pipelines abiding by a well-understood format, making code readable to others.
The more apparent benefits of Airflow are centered around its powerful GUI. Wrangling multiple pipelines prone to failure might be the least glorious aspect of any data engineer's job. By creating our pipelines within Airflow, we gain immediate visibility across all our pipelines to spot areas of failure quickly. Even more impressive is that the code we write is visually represented in Airflow's GUI. Not only can we check the heartbeat of our pipelines, but we can also view graphical representations of the code we write.
To get started with Airflow, we should stop throwing the word "pipeline" around. Instead, get used to saying DAG.

What is a DAG?
Airflow refers to what we've been calling "pipelines" as DAGs (directed acyclic graphs). In computer science, a directed acyclic graph means a workflow that only flows in a single direction. Each "step" in the workflow (an edge) is reached via the previous step until we reach the beginning. The connection of edges is called a vertex.
Consider how nodes in a tree data structure relate. Every node has a "parent" node, which means that a child node cannot be its parents' parent. That's it - there's no need for fancy language here.
Edges in a DAG can have numerous "child" edges. Interestingly, a "child" edge can also have multiple parents (this is where our tree analogy fails us). Here's an example:
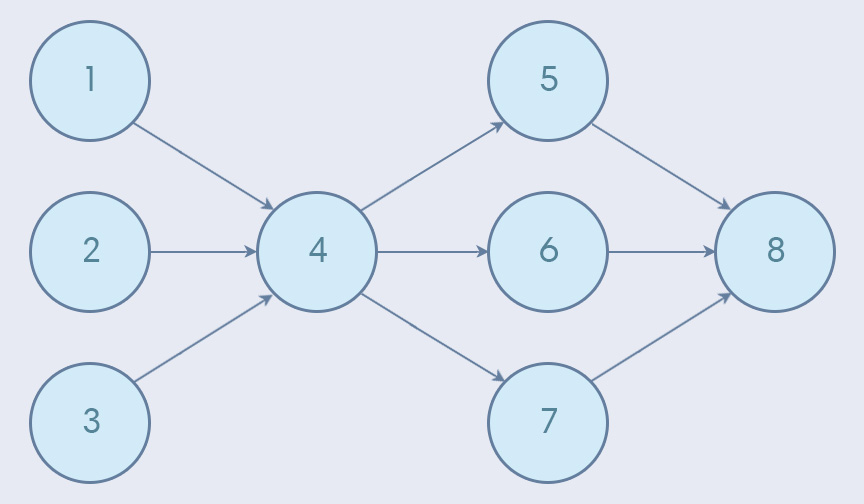
In the above example, the DAG begins with edges 1, 2, and 3, kicking things off. At various points in the pipeline, information is consolidated or broken out. Eventually, the DAG ends with edge 8.
We'll dig deeper into DAGs, but first, let's install Airflow.
Installing Airflow
Setting up Apache data tools typically entails an awful experience. Airflow doesn't require installing a highly specific version of Java or creating an Oracle account (also known as Cruel and Unusual Punishment as defined in the 18th Amendment).
Setting up Airflow is refreshingly straightforward. To get started with a barebones Airflow setup, all we need is to install the apache-airflow Python library:
pip3 install apache-airflowInstalling Airflow on its own is fine for testing the waters, but to build something somewhat meaningful, we'll need to install one of Airflow's many "extra features." Each Airflow "feature" we install enables a built-in integration between Airflow and service, most commonly a database. Airflow installs an SQLLite feature by default.
Airflow needs a database to create tables necessary for running Airflow. Chances are we won't be using a local SQLite database when we use Airflow in production, so I've opted to use a Postgres database:
pip3 install apache-airflow[postgres]
pip3 install psycopg2-binaryAirflow leverages the familiar SQLAlchemy library to handle database connections. As a result, setting database connection strings should all be familiar.
Airflow has features for much more than just databases. Some features that can be installed with airflow include Redis, Slack, HDFS, RabbitMQ, and much more. To see everything available, check out the list:
https://airflow.apache.org/installation.html
Basic Airflow Configuration
Before we do anything, we need to set a vital environment variable called AIRFLOW_HOME. When we initiate Airflow, it will look for a folder that matches the name set as the value of this variable. Then, it's going to unpack a bunch of core files needed to run Airflow into said folder:
AIRFLOW_HOME=./airflow./airflow/airflow.cfgNext, we need to unpack the Airflow configuration files into /airflow. This is as simple as running the following command:
airflow initdbA bunch of new files should magically appear in your /airflow directory like this:
./
├── /airflow
│   ├── airflow.cfg
│   ├── airflow.db
│   ├── /logs
│   │   └── /scheduler
│   │       ├── 2019-06-01
│   │       └── latest -> airflow/logs/scheduler/2019-06-01
│   └── unittests.cfg
└── requirements.txtRunning initdb for the first time, defaults to creating an Airflow instance pointing to a local SQLite database. Once we run it the first time, we can change the variables found in our new ./airflow/airflow.cfg file to point to a Postgres database (or database of your choosing).
Database Configuration
To hook Airflow up to a live database, we need to modify some settings in airflow.cfg. Look for the sql_alchemy_conn variable and paste an SQLAlchemy connection string for your database of choice. If you're using Postgres, don't forget to set sql_alchemy_schema it as well:
sql_alchemy_conn = postgresql+psycopg2://[username]:[password]@[host]:[post]/[database]
sql_alchemy_schema = public./airflow/airflow.cfgWith those changes made, initialize your database again:
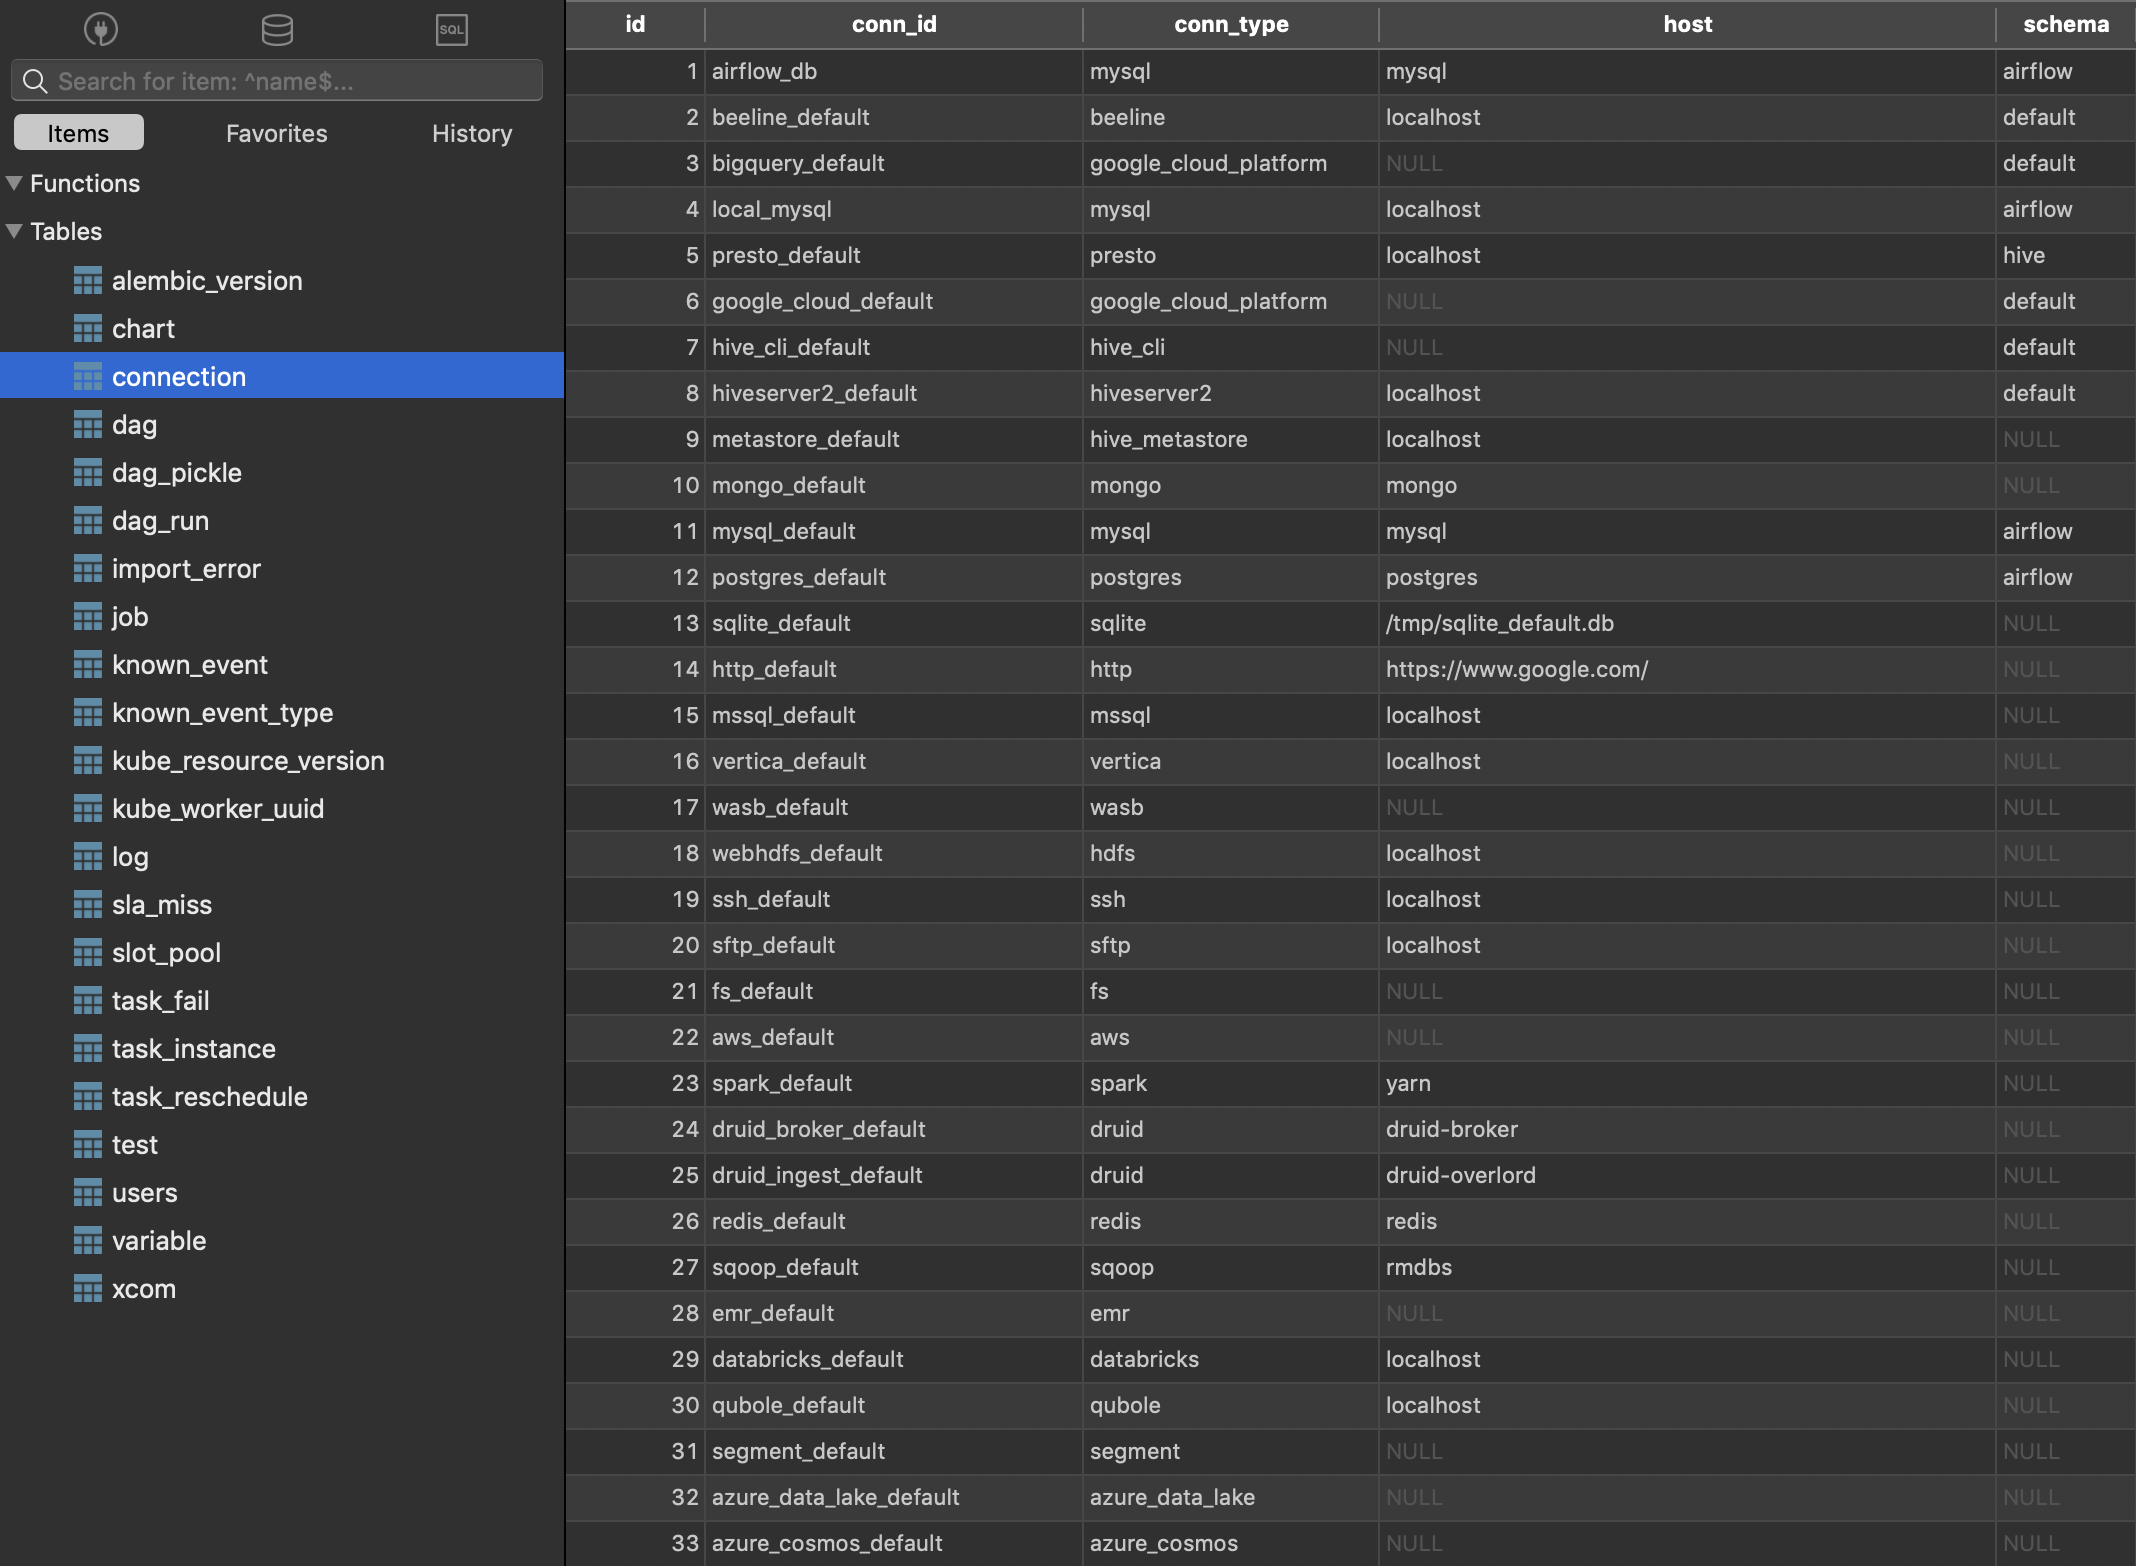
airflow initdbThis time, Airflow should initialize your provided database with tables necessary for running the application. I decided to take a peek in my database to see for myself:
Launch Airflow
With everything configured, run the following to kick up Airflow at port 8080:
airflow webserver -p 80808080The output should look something like this:
  ____________       _____________
 ____    |__( )_________  __/__  /________      __
____  /| |_  /__  ___/_  /_ __  /_  __ \_ | /| / /
___  ___ |  / _  /   _  __/ _  / / /_/ /_ |/ |/ /
 _/_/  |_/_/  /_/    /_/    /_/  \____/____/|__/
[2019-06-01 04:38:27,785] {__init__.py:305} INFO - Filling up the DagBag from airflow/dags
Running the Gunicorn Server with:
Workers: 4 sync
Host: 0.0.0.0:8080
Timeout: 120
Logfiles: - -
=================================================================Now let's see what's going on at 127.0.01.1:8080:

Sweet! Airflow is kind enough to create many example DAGs for us to poke around in. These examples are a pretty good starting point for becoming acquainted.
Before we get too crazy, let's break down the elements of the screen above:
- DAG: Name of a DAG job.
- Schedule: The reoccurring CRON schedule for running the current DAG.
- Owner: Username within your Airflow instance who owns the job.
- Recent Tasks: Visual status (pass/fail/running) of the last ten times this job ran.
- Last run: Time the DAG was run last.
- DAG Runs: Total number of times a DAG has been executed.
Feel free to click around and break some things while you can.
Anatomy of an Airflow DAG
Any pipeline is essentially just a chain of tasks, and DAGs are no different. Within DAGs, our "tasks" are defined by operators.
Let's take a step back: DAGs are our workflows, and tasks within a DAG are the actions taken by said workflow. An "operator" refers to the type of action a task belongs to, such as a database action or script action. It isn't crazy to imagine we might have multiple database-related actions in a single DAG: in this case, we'd use the same operator to define multiple tasks (PostgresOperator, assuming we're dealing with Postgres).
Here are some different types of operators:
BashOperator: Execute a bash command.PythonOperator: Call a Python function.EmailOperator: Send an email.SimpleHttpOperator: Generate an HTTP request.MySqlOperator,SqliteOperator,PostgresOperator: Execute a SQL command.DummyOperator: Operator that does nothing (basically for testing purposes).
There's also:
DingdingOperator: Sends a message to the "Dingding" Alibaba message service. I didn't know what this was, either.- Google Cloud Operators: There are a ton of operators specific to Google Cloud services, such as Bigtable operators, Compute Engine operators, Cloud function operators, etc.
- Sensor: Waits for an event to occur before moving forward (can wait for time to elapse, for a script to finish, etc).
Operators can occur at any point in a DAG. We can fire multiple operators throughout the lifetime of a single DAG at any point.
DAGs By Example
Let's explore some of the examples DAGs Airflow has provided us. An excellent place to start is example_python_operator:
Here I'm checking out the Graph View tab of a DAG: this view is the best representation of what's happening from start to finish.
This seems to be a simple DAG: it's just spinning up five Python operators, which trigger a sleep timer, and nothing else. Run this DAG by clicking the Trigger DAG item in our menu bar, and check the output in whichever console you used to launch Airflow:
[2019-06-01 06:07:00,897] {__init__.py:305} INFO - Filling up the DagBag from /Users/toddbirchard/.local/share/virtualenvs/airflow-a3hcxs5D/lib/python3.7/site-packages/airflow/
example_dags/example_python_operator.py
127.0.0.1 - - [01/Jun/2019:06:07:01 -0400] "POST /admin/airflow/trigger?dag_id=example_python_operator&origin=%2Fadmin%2Fairflow%2Ftree%3Fdag_id%3Dexample_python_operator HTTP/
1.1" 302 307 "https://0.0.0.0:8080/admin/airflow/code?dag_id=example_python_operator" "Mozilla/5.0 (Macintosh; Intel Mac OS X 10_14_4) AppleWebKit/537.36 (KHTML, like Gecko) Chr
ome/74.0.3729.169 Safari/537.36"
127.0.0.1 - - [01/Jun/2019:06:07:01 -0400] "GET /admin/airflow/tree?dag_id=example_python_operator HTTP/1.1" 200 9598 "https://0.0.0.0:8080/admin/airflow/code?dag_id=example_pyt
hon_operator" "Mozilla/5.0 (Macintosh; Intel Mac OS X 10_14_4) AppleWebKit/537.36 (KHTML, like Gecko) Chrome/74.0.3729.169 Safari/537.36"
This doesn't tell us anything, but then again... isn't that what we'd expect? After all, there aren't any steps after the "sleep" Python operators. Thus, nothingness might be a success here.
To get a better idea, check out the code tab. That's right: we can investigate the source code for any DAG from our GUI!
from __future__ import print_function

import time
from builtins import range
from pprint import pprint

import airflow
from airflow.models import DAG
from airflow.operators.python_operator import PythonOperator


args = {
    'owner': 'airflow',
    'start_date': airflow.utils.dates.days_ago(2),
}

dag = DAG(
    dag_id='example_python_operator',
    default_args=args,
    schedule_interval=None,
)


# [START howto_operator_python]
def print_context(ds, **kwargs):
    pprint(kwargs)
    print(ds)
    return 'Whatever you return gets printed in the logs'


run_this = PythonOperator(
    task_id='print_the_context',
    provide_context=True,
    python_callable=print_context,
    dag=dag,
)
# [END howto_operator_python]


# [START howto_operator_python_kwargs]
def my_sleeping_function(random_base):
    """This is a function that will run within the DAG execution"""
    time.sleep(random_base)


# Generate 5 sleeping tasks, sleeping from 0.0 to 0.4 seconds respectively
for i in range(5):
    task = PythonOperator(
        task_id='sleep_for_' + str(i),
        python_callable=my_sleeping_function,
        op_kwargs={'random_base': float(i) / 10},
        dag=dag,
    )

    run_this >> task
# [END howto_operator_python_kwargs]
Every DAG starts with some essential configuration variables. args contains high-level configuration values:
owner: The Airflow user the DAG belongs to (again).start_date: The time at which the DAG should execute.email: An email address for alert notifications when something goes wrong.email_on_failure: When True, a failed execution will email the specified email address with details of the failed job.email_on_retry: When True, an email will be sent every time the DAG attempts to retry a failed execution.retries: Number of times to retry the DAG in case of a failure.retry_delay: Time between retry attempts.concurrency: Number of processes to run the DAG.depends_on_past: If True, this task will depend on the success of the preceding task before execution.
After setting our DAG's configuration, the DAG is instantiated with dag = DAG(). We pass a few things into DAG() upon creation (like the args we set earlier). This is where we set the DAG's name and schedule time.
In our DAG's graph view, we saw tasks named print_the_context, and a bunch of tasks following a convention like sleep_for_#. We can see precisely where these task names are being defined in the source code. Check out the first task:
# [START howto_operator_python]
def print_context(ds, **kwargs):
    pprint(kwargs)
    print(ds)
    return 'Whatever you return gets printed in the logs'


run_this = PythonOperator(
    task_id='print_the_context',
    provide_context=True,
    python_callable=print_context,
    dag=dag,
)PythonOperatorThe first task is being set inside PythonOperator() with an id equal to print_the_context. It's a function that prints some information and returns a string!
Here's the second group of tasks:
def my_sleeping_function(random_base):
    """Will run within the DAG execution."""
    time.sleep(random_base)


# Generate 5 sleeping tasks, sleeping from 0.0 to 0.4 seconds respectively
for i in range(5):
    task = PythonOperator(
        task_id='sleep_for_' + str(i),
        python_callable=my_sleeping_function,
        op_kwargs={'random_base': float(i) / 10},
        dag=dag,
)Are you not entertained?! This time, the Python operator is in a for loop. This is an excellent demonstration of how we can create DAGs dynamically!
Do you think you have what it takes to create your own DAG? I think you do too. Let's set the stage.
Getting Ready to Create Our Own DAG
We should knock out a couple of housekeeping items before moving forward. This won't take long.
Create an Airflow User
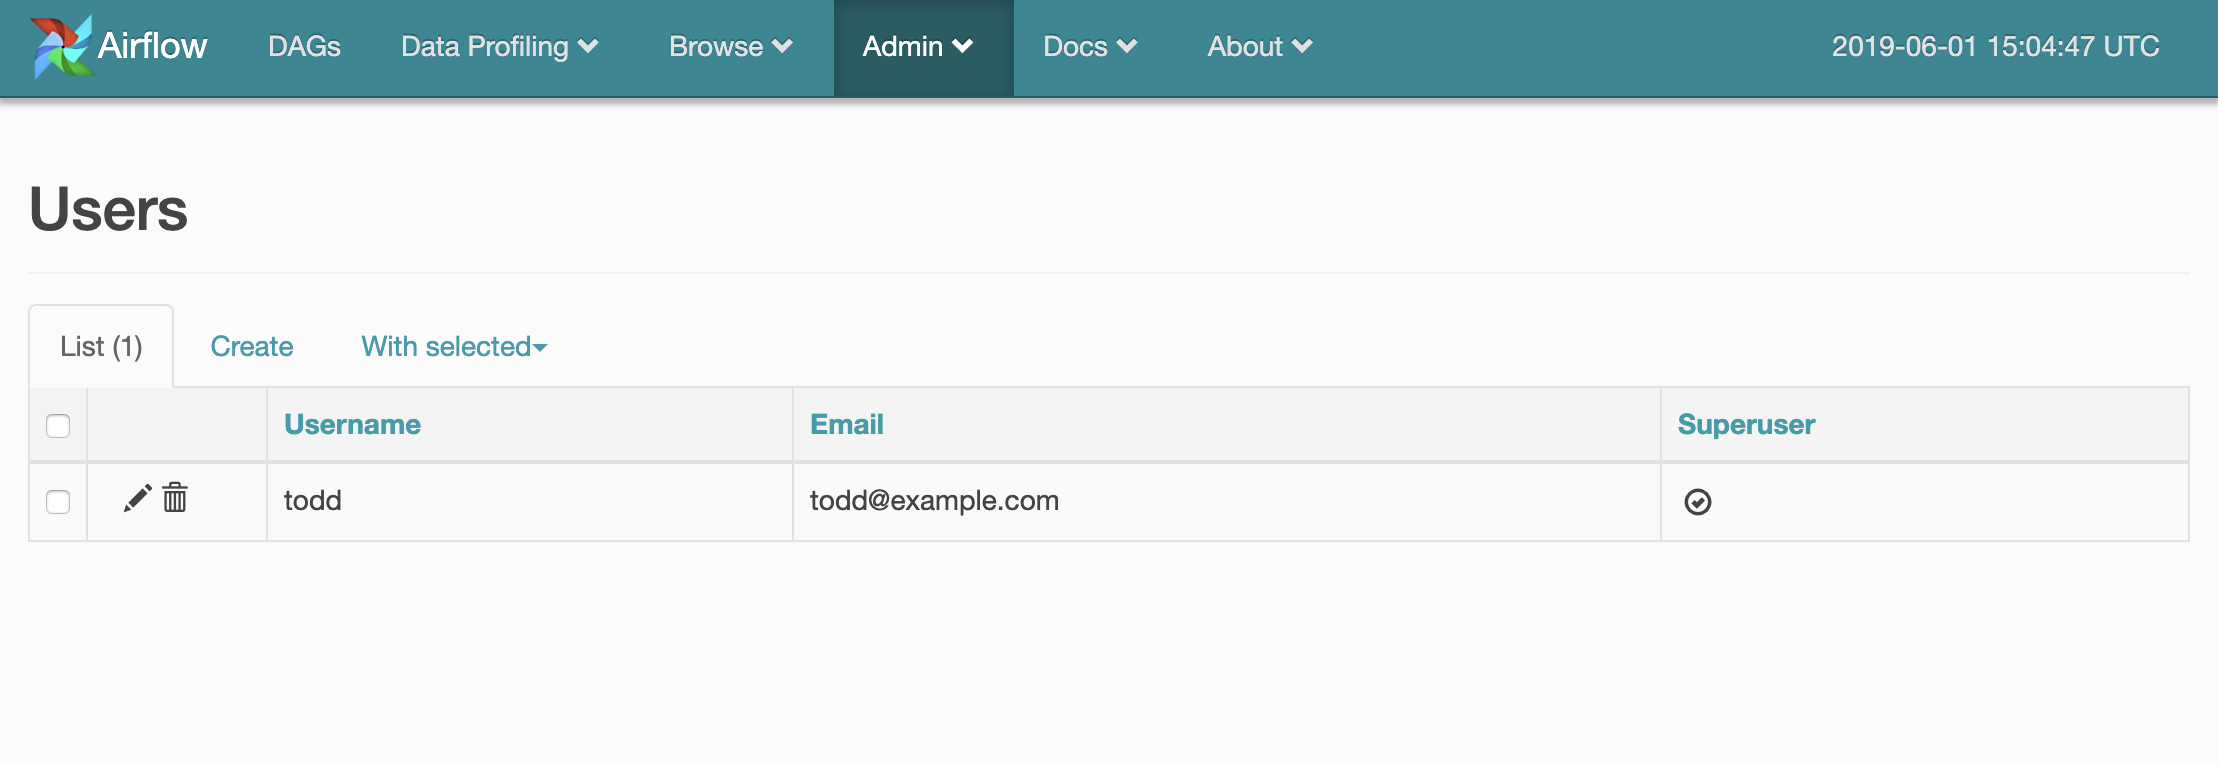
As we've already seen, DAGs need to have an "owner." The default DAGs we've seen so far set their user as airflow. We can't do this with the new DAGs we create -we need to set a legitimate user. In your Airflow UI, navigate to Admin > Users.
Then, create a user that will "own" our new DAG.
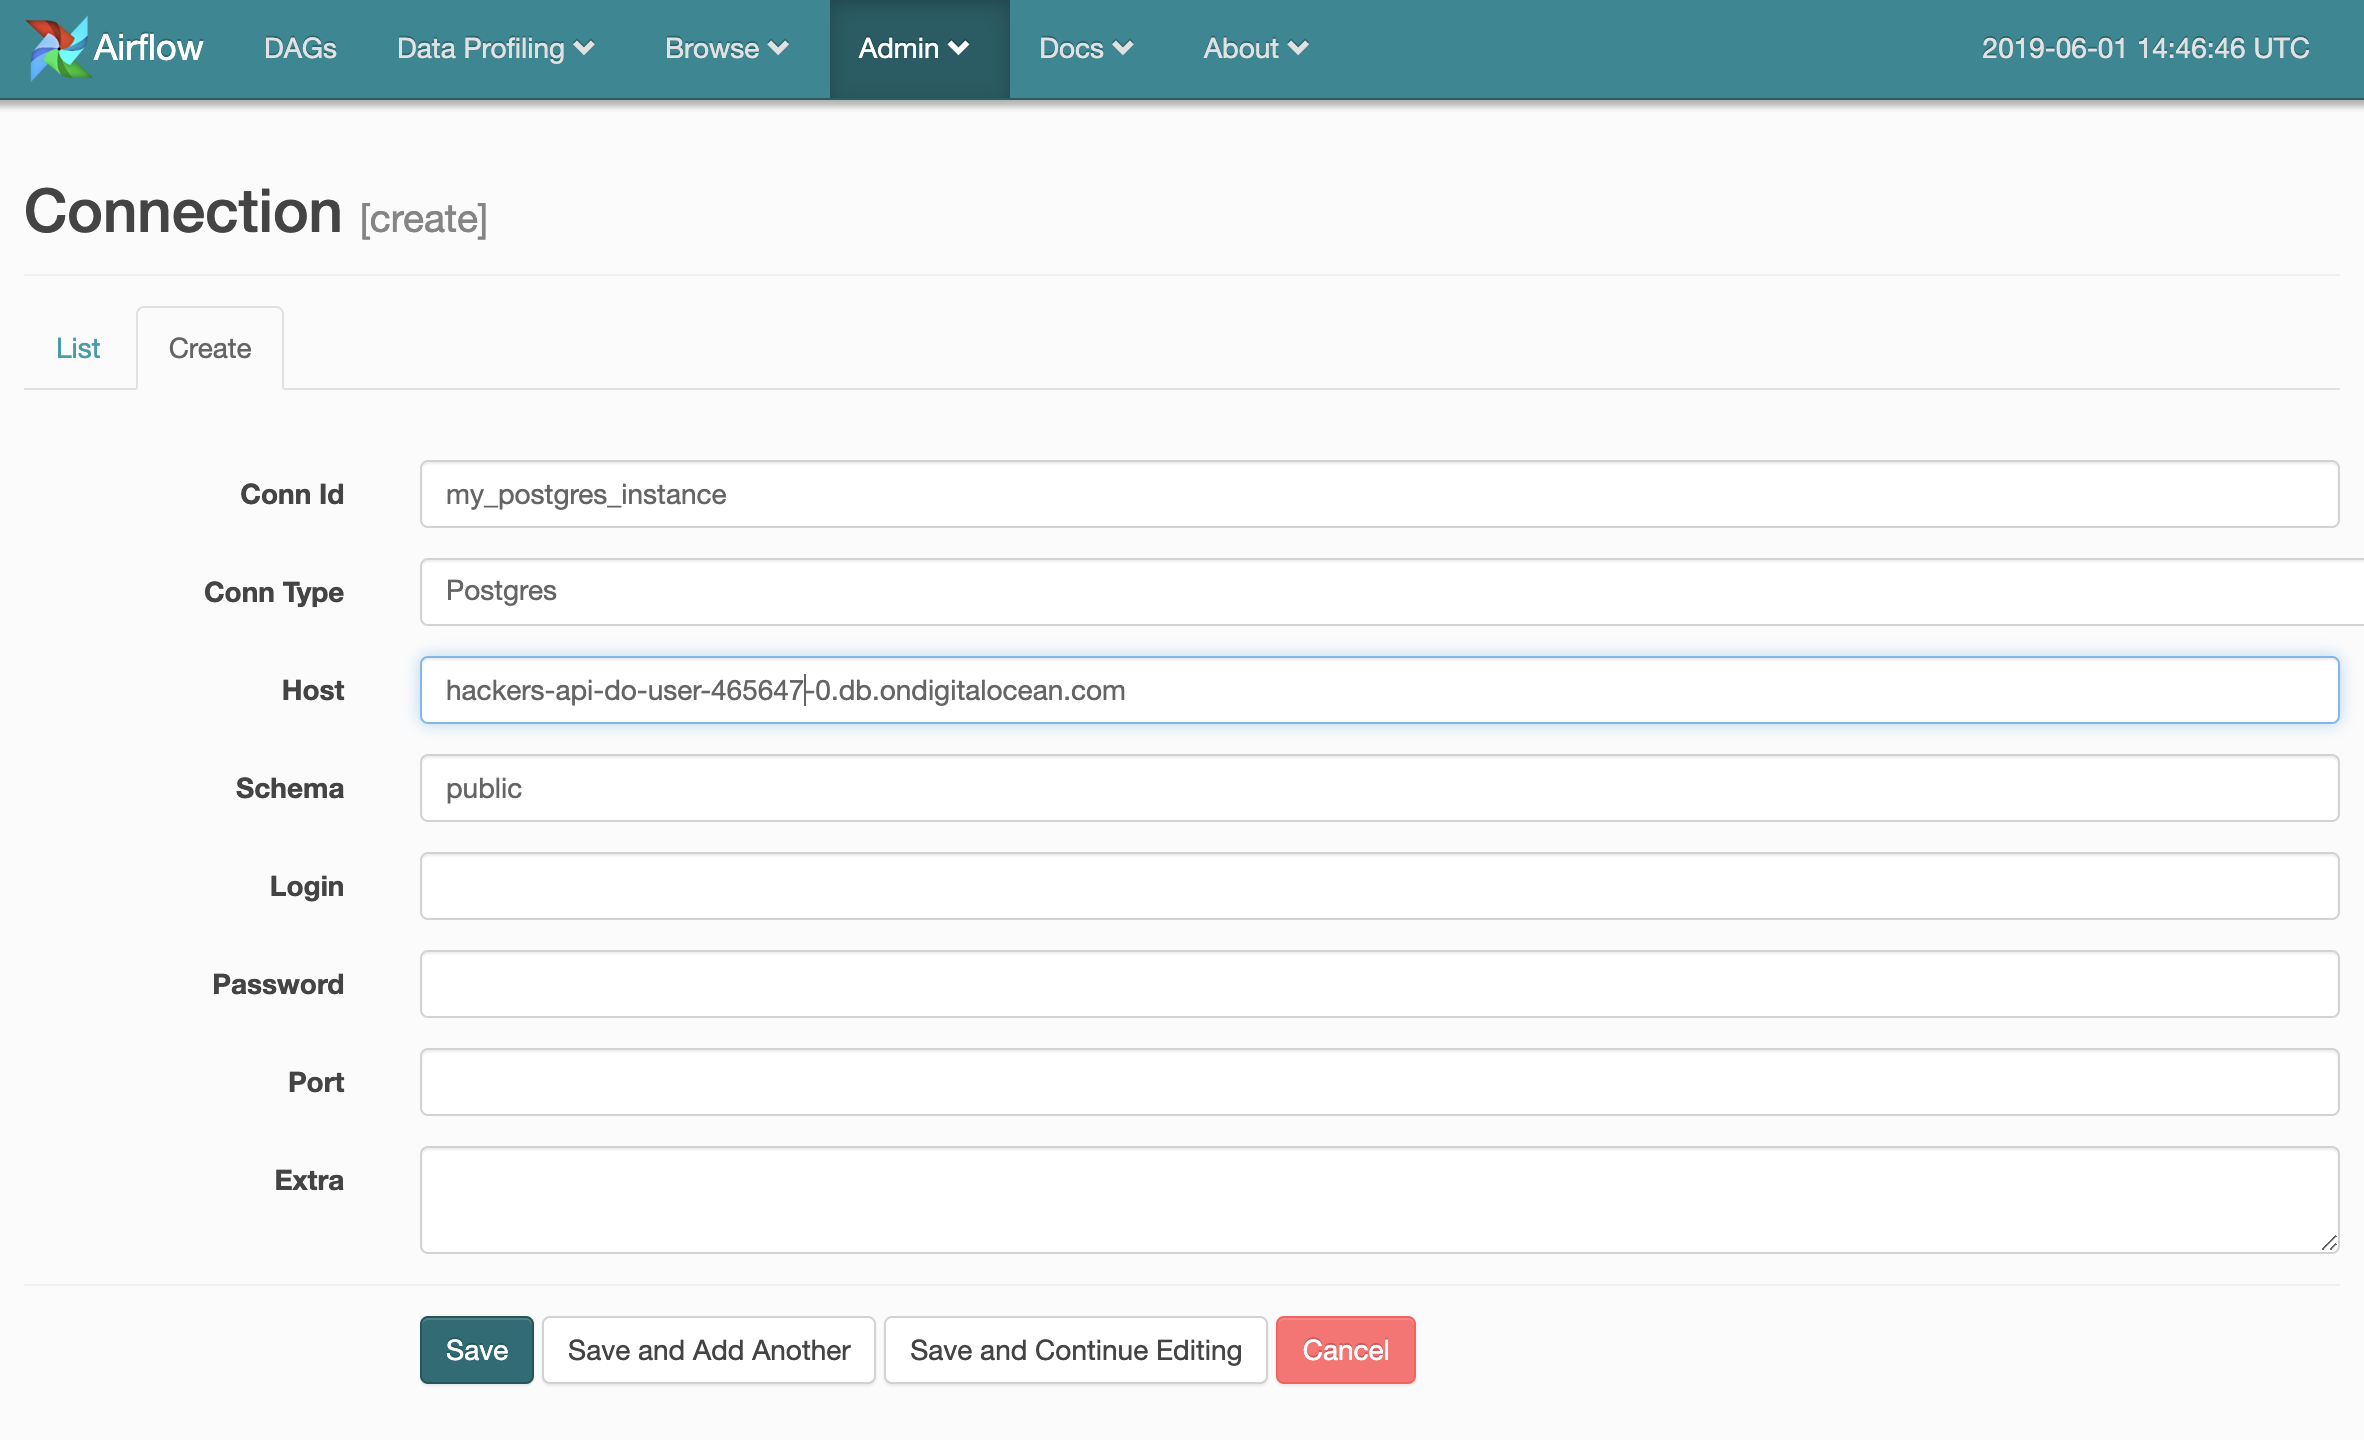
Create a New Connection
We should have our DAG insert information into a database to simulate a real-world scenario. Destinations for DAG output need to be created and managed in the Airflow UI under Admin > Connections.
I've started setting up a Postgres connection below:
Creating our First DAG
Shut down your web server and create a folder within /airflow called /dags. This will be where we store the source code for DAGs we create moving forward (the location of your DAGs can be changed in airflow.cfg, but /dags is the default). Create a Python file in /dags named something like my_first_dag.py (the file name doesn't matter).
I'm going to create a DAG made up of three tasks. These tasks will use the Bash, Python, and Postgres operators:
from airflow import DAG
from airflow.operators.bash_operator import BashOperator
from airflow.operators.python_operator import PythonOperator
from airflow.operators.postgres_operator import PostgresOperator
from datetime import datetime, timedelta


default_args = {
    'owner': 'todd',
    'depends_on_past': False,
    'start_date': datetime(2015, 6, 1),
    'email': ['todd@example.com'],
    'email_on_failure': False,
    'email_on_retry': False,
    'retries': 1,
    'retry_delay': timedelta(minutes=5)
}

dag = DAG(
    dag_id='my_custom_dag',
    default_args=default_args,
    schedule_interval=timedelta(days=1)
)

# Task 1
t1 = BashOperator(
    task_id='print_date',
    bash_command='date',
    dag=dag
)

# Task 2
def my_python_function():
    now = datetime.now()
    response = 'This function ran at ' + str(now)
    return response


t2 = PythonOperator(
    task_id='my_python_task',
    python_callable=my_python_function,
    params={'my_param': 'Parameter I passed in'},
    dag=dag
)


# Task 3
t3 = PostgresOperator(
    task_id='my_postgres_task',
    sql="INSERT INTO test VALUES (3, 69, 'this is a test!');",
    postgres_conn_id='my_postgres_instance',
    autocommit=True,
    database="airflow2",
    dag=dag
)

# Pipeline Structure
t2.set_upstream(t1)
t3.set_upstream(t2)
I've purposely set many more arguments in default_args to demonstrate what this would look like. Note the value of the owner argument.
Check out the tasks we created:
- Task 1 is a simple bash function to print the date.
- Task 2 returns the current time via a Python function.
- Task 3 inserts a bunch of values into a Postgres Database (inserts 3 values:
3, 69, 'this is a test!').
The last part of our script is muy importante: this is where we set our pipeline structure. set_upstream() We set the order of operations to occur by calling set_upstream() on each task. It is inferred that t1 will be the first task. Forgetting to set your pipeline structure will result in tasks that don't run! There are a couple of other ways to set this:
set_downstream()achieves the opposite ofset_upstream().t1 >> t2 >> t3is a cleaner way of handling a straightforward DAG like this one.
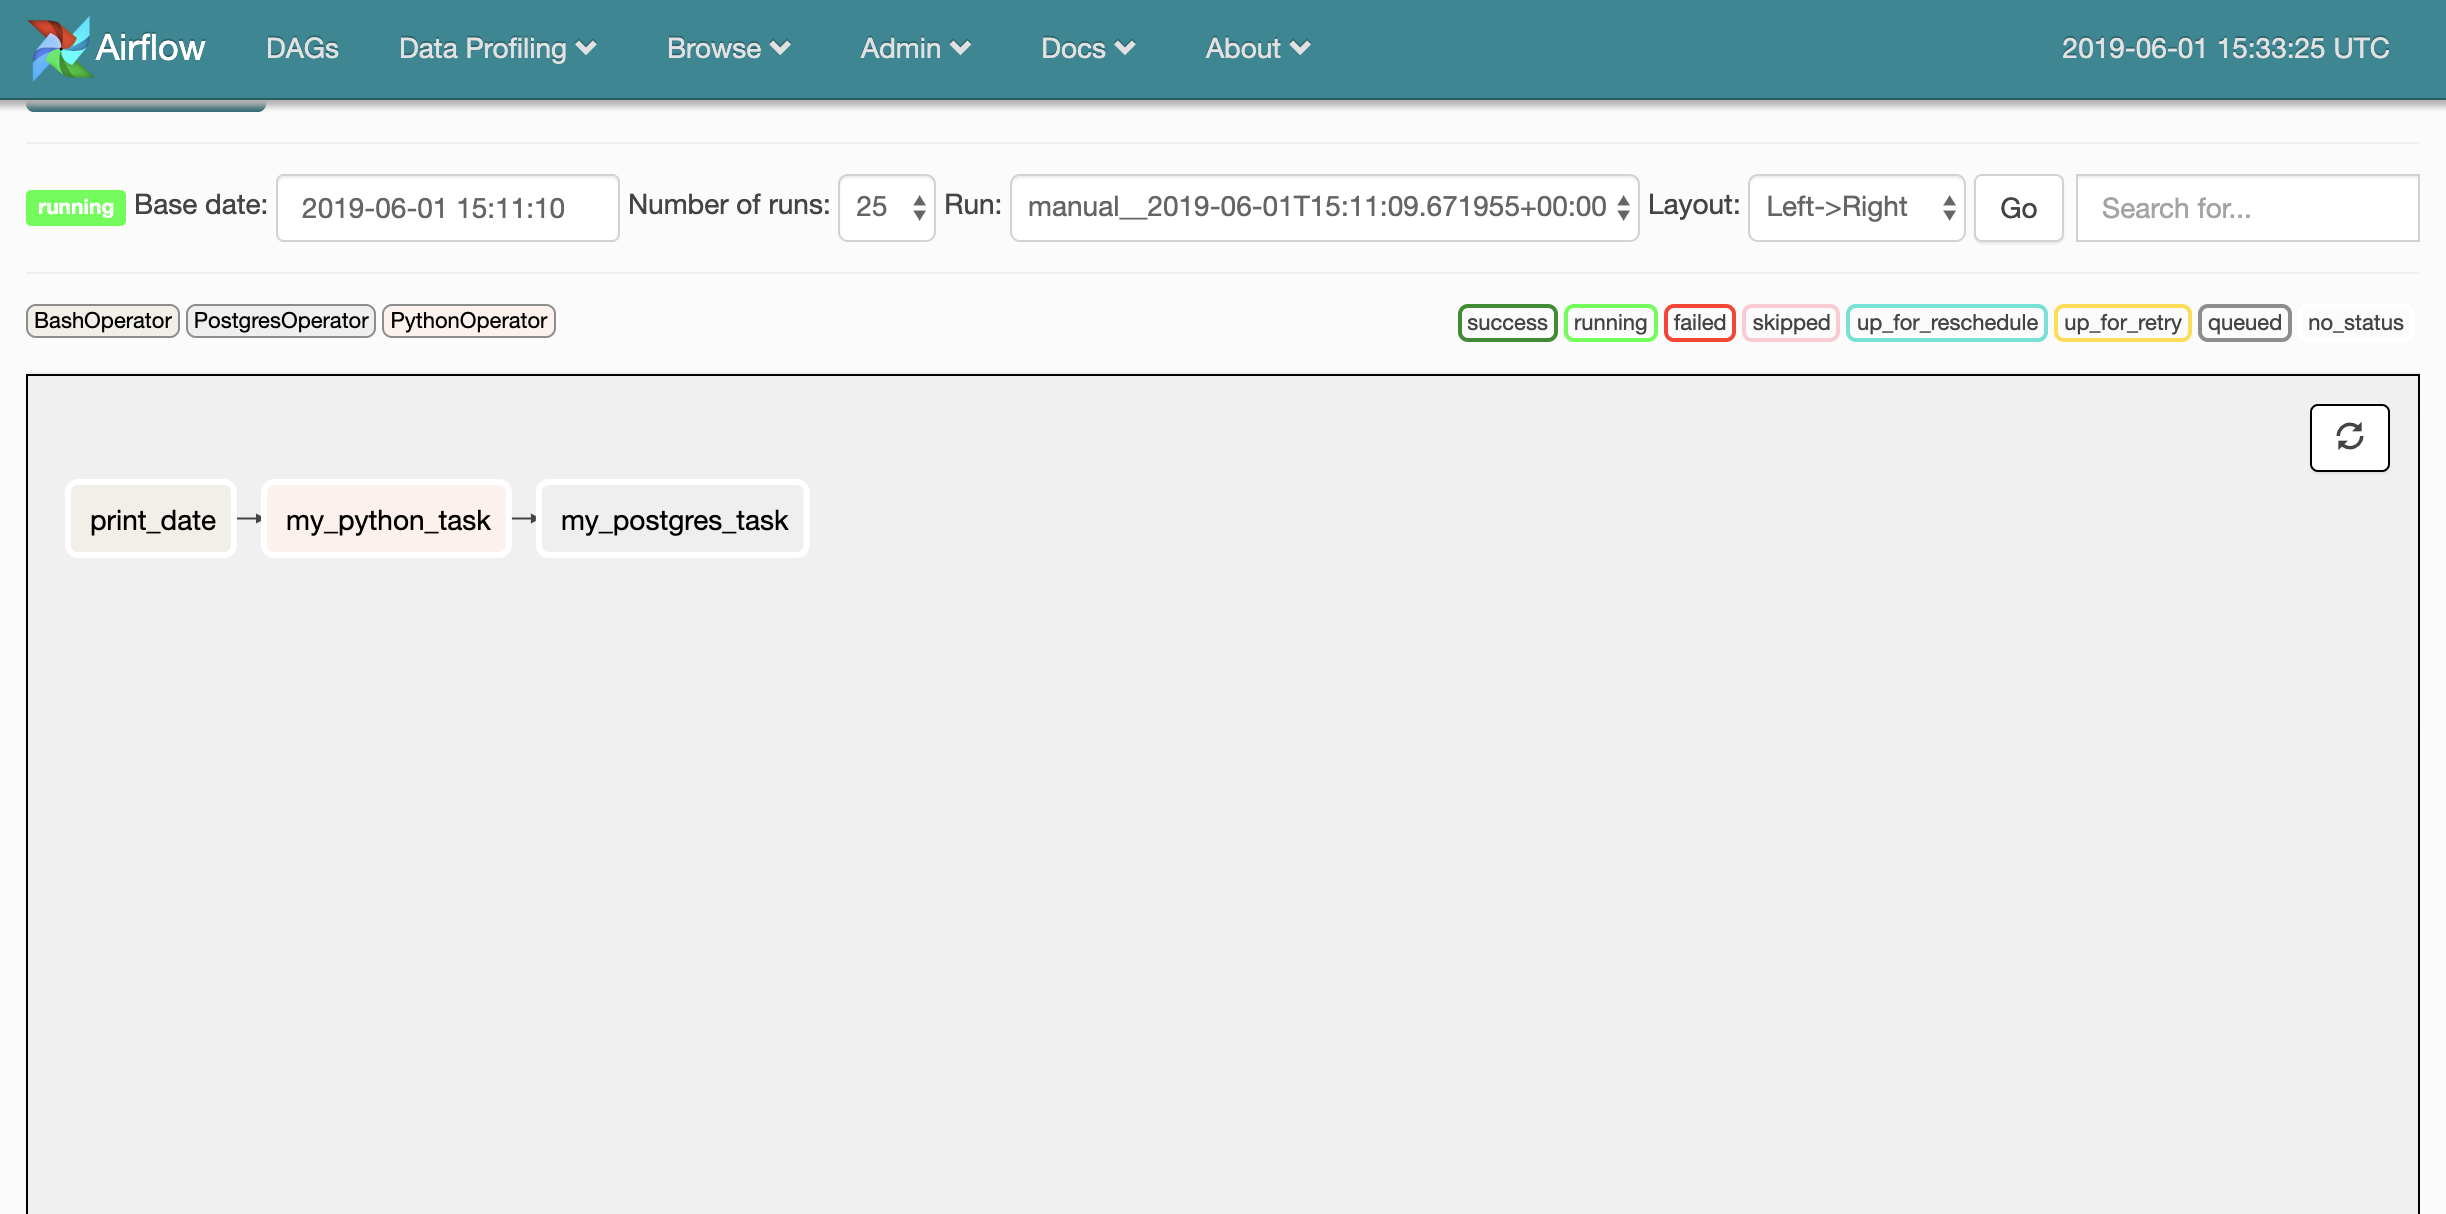
We should be able to see the structure of this DAG in the UI's graph view now:

Testing Our DAG
Don't stress if your DAG doesn't run the first time! This can be a bit frustrating. Luckily, there's an easy way to test tasks in our new DAG via the Airflow CLI. Simply enter the below:
airflow test [your_dag_id] [your_task_name_to_test] [today's_date]
This is what I entered to test the Postgres task:
airflow test my_custom_dag my_python_task 06/01/2019my_python_task in DAG my_custom_dagAfter some adjustments, I was able to receive a success:
[2019-06-01 11:36:49,702] {__init__.py:1354} INFO - Starting attempt 1 of 2
[2019-06-01 11:36:49,702] {__init__.py:1355} INFO -
--------------------------------------------------------------------
[2019-06-01 11:36:49,702] {__init__.py:1374} INFO - Executing <Task(PythonOperator): my_python_task> on 2019-06-01T00:00:00+00:00
[2019-06-01 11:36:50,059] {python_operator.py:104} INFO - Exporting the following env vars:
AIRFLOW_CTX_DAG_ID=my_custom_dag
AIRFLOW_CTX_TASK_ID=my_python_task
AIRFLOW_CTX_EXECUTION_DATE=2019-06-01T00:00:00+00:00
[2019-06-01 11:36:50,060] {python_operator.py:113} INFO - Done. Returned value was: This function ran at 2019-06-01 11:36:50.060110Surely enough, the record was created in my database!